Spatial Multi-Sensor FP400
Product Introduction
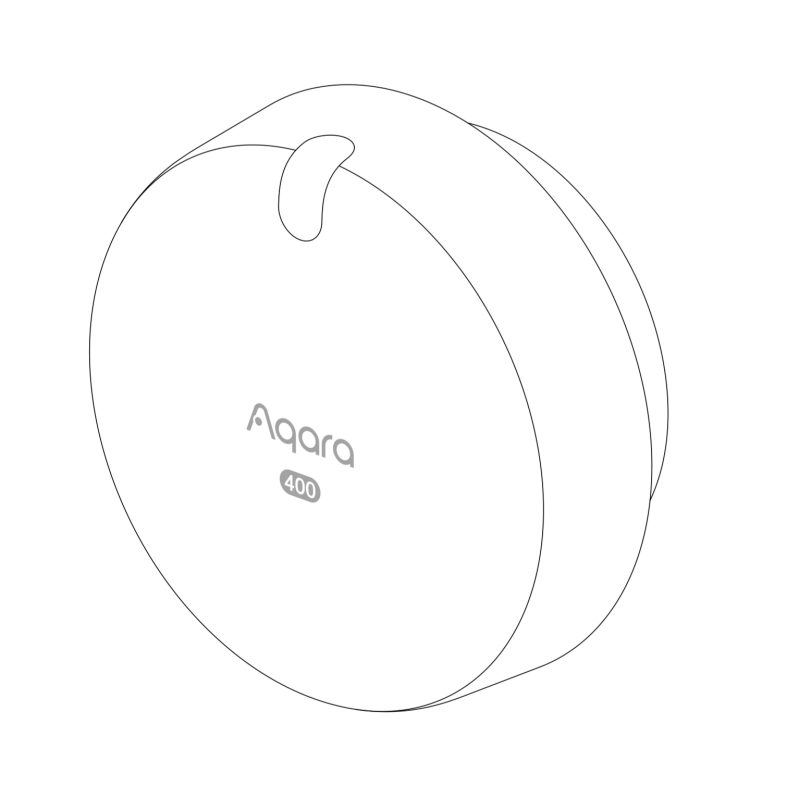
The Aqara Spatial Multi-Sensor FP400 is equipped with high-precision millimeter-wave radar technology, integrating human presence detection, multi-person tracking, AI Enhanced Person Detection, and illuminance detection. Centered on precise sensing, it creates a refined, whole-home active smart experience.
The product features exceptional spatial perception capabilities, supporting up to 8 customizable zones based on a 320-grid division, and can simultaneously track the real-time position and movement direction of 10 targets. It accurately distinguishes behaviors such as left/right entry, forward/backward motion, and approaching/retreating, seamlessly linking with various smart devices to trigger personalized spatial automation scenarios and enable invisible, intelligent interactions.
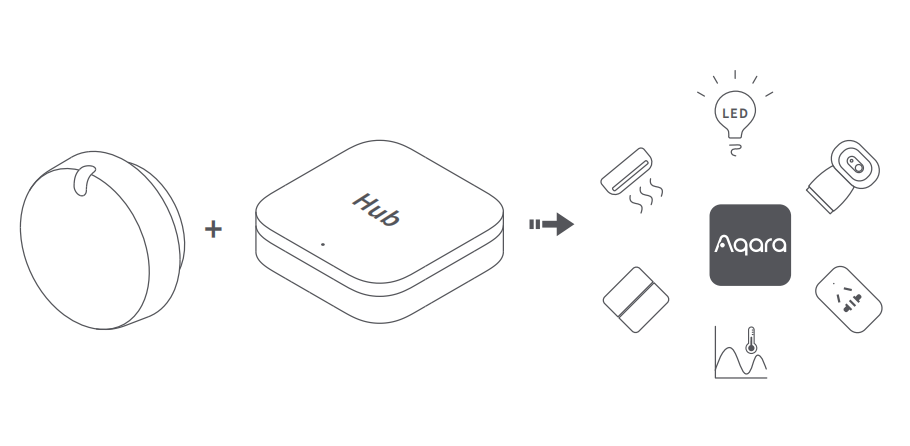
For connectivity, the FP400 supports dual protocols: Zigbee and Matter. With Zigbee, it connects to Aqara Life via an Aqara hub and can bridge to third-party Matter platforms through the Aqara Matter Hub. Under the Matter protocol, the device connects to Aqara Life via the Aqara Matter Hub, supports up to 8 custom zone configurations within Aqara Life, and can be shared to third-party Matter platforms via a Matter pairing code, enabling compatibility across multiple smart ecosystems.
- Full functionality requires pairing with an Aqara hub and the Aqara Life app.
- Due to protocol limitations and third-party ecosystem support, functions may vary across different protocols and ecosystems. Certain specific features are only supported in Aqara Life.
Product Components
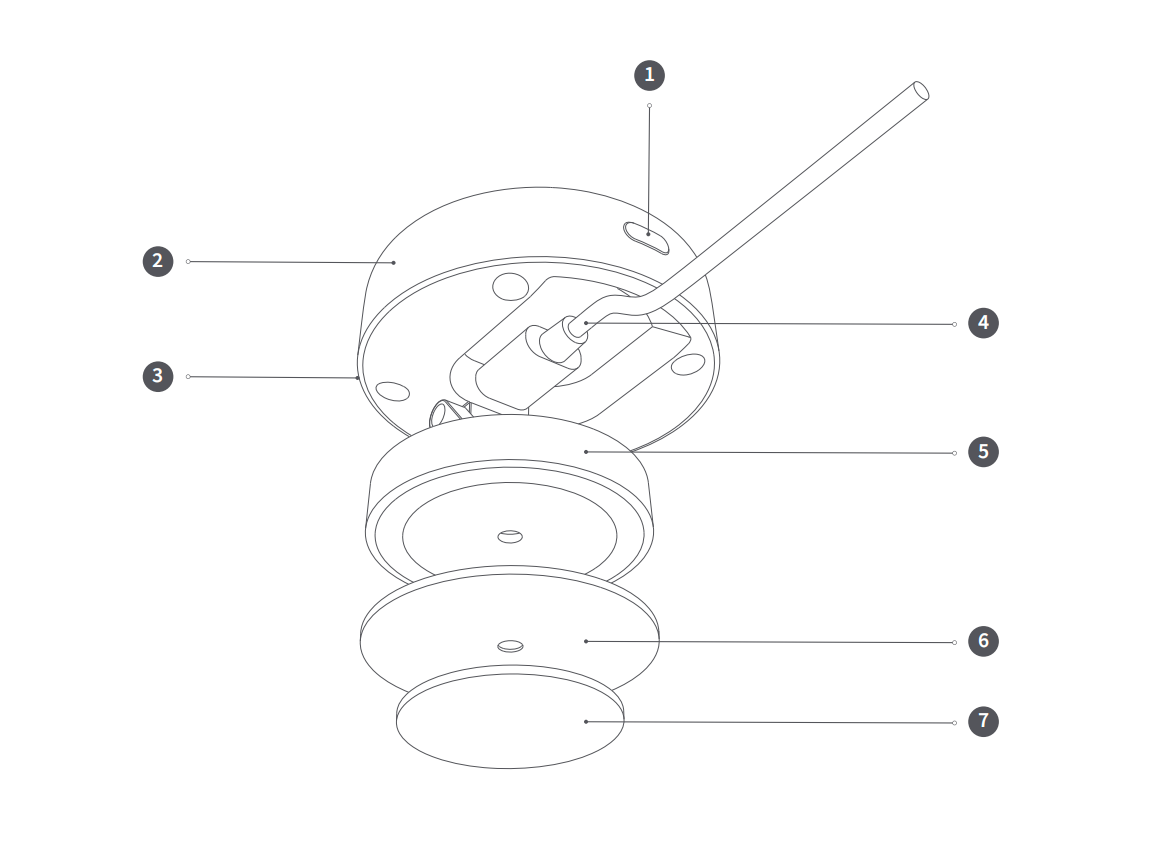
1: Reset Button
2: Body
3: Indicator Light
4: USB-C Power Cord
5: Bracket
6: Magnetic Plate
7: Adhesive Backing
Device Installation
Installation Method
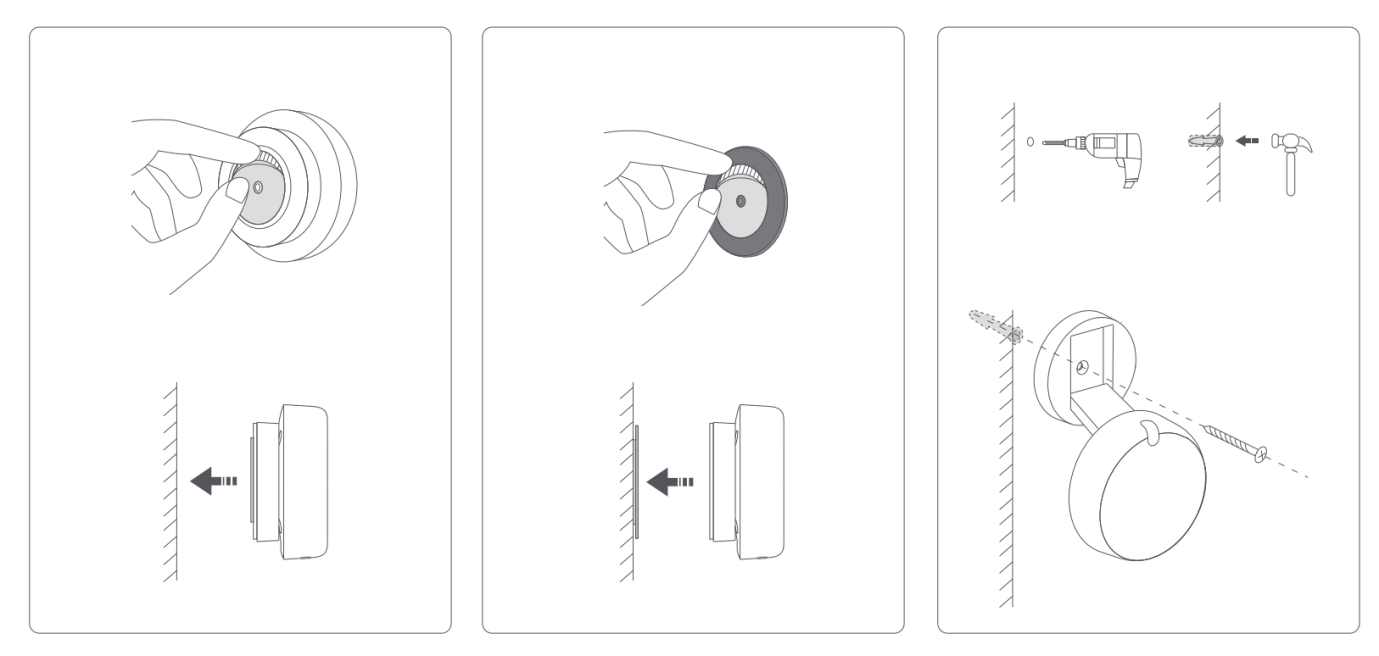
The device can be mounted using adhesive, magnetic attachment, or expansion screws, and supports side and ceiling mounting. Different installation methods and heights affect the detection range. Users can select an appropriate installation location based on the desired detection coverage, and adjust the detection range by changing the installation angle and device tilt angle.
Wall Mounting
- Installation Height: 1.5 meters - 2 meters
- Detection Angle: Horizontal 120°, Vertical 100°
- Maximum Detection Range: Forward 10 meters, Width 8 meters (excessive tilt may reduce detection range)
- For detecting a larger area, it is recommended to install in the middle of the wall, with the radar front facing the shorter side of the area to be detected
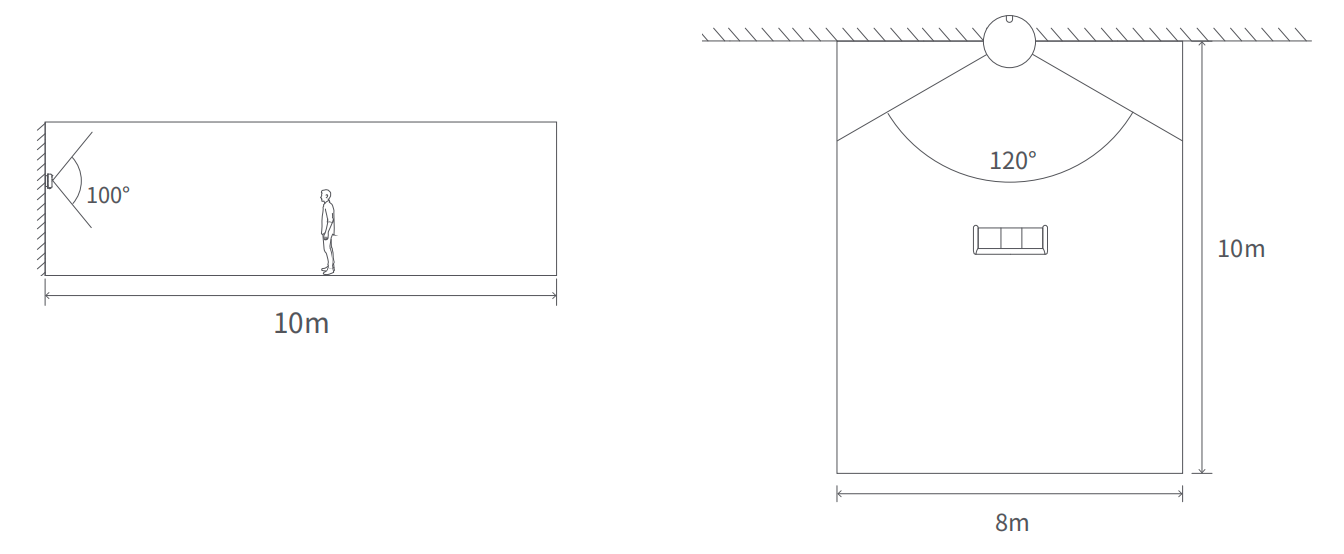
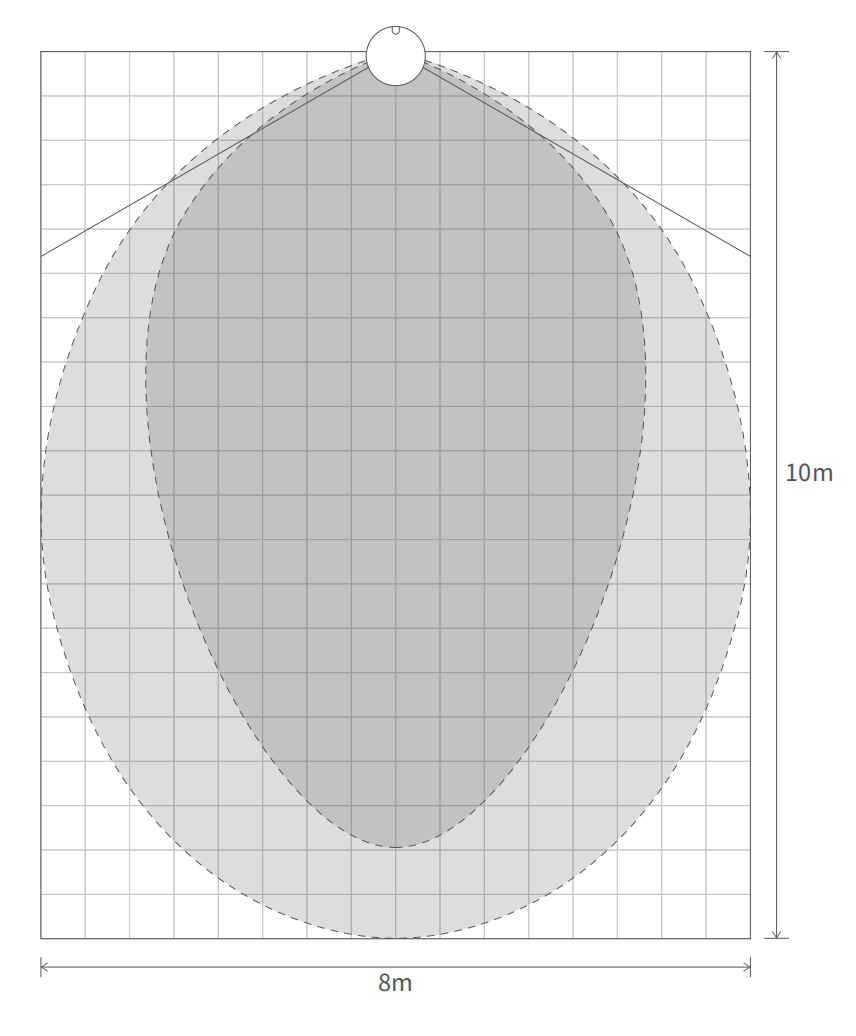
- The above maximum detection range is measured under laboratory conditions. Actual motion and presence detection ranges may vary due to installation height, angle, wall reflectivity, environmental interference, target posture, and other factors. Detection blind spots exist in areas beyond 120°; avoid placing critical detection zones (especially entrances and exits) in these blind spots.
- Targets are recommended to remain at least 0.5 m away from walls and windows. Being too close may cause false targets (ghosting) and positioning jumps due to multipath echoes from wall reflections.
Corner Mounting
- Installation Height: 1.5 meters - 2 meters
- Detection Angle: Horizontal 120°, Vertical 100°
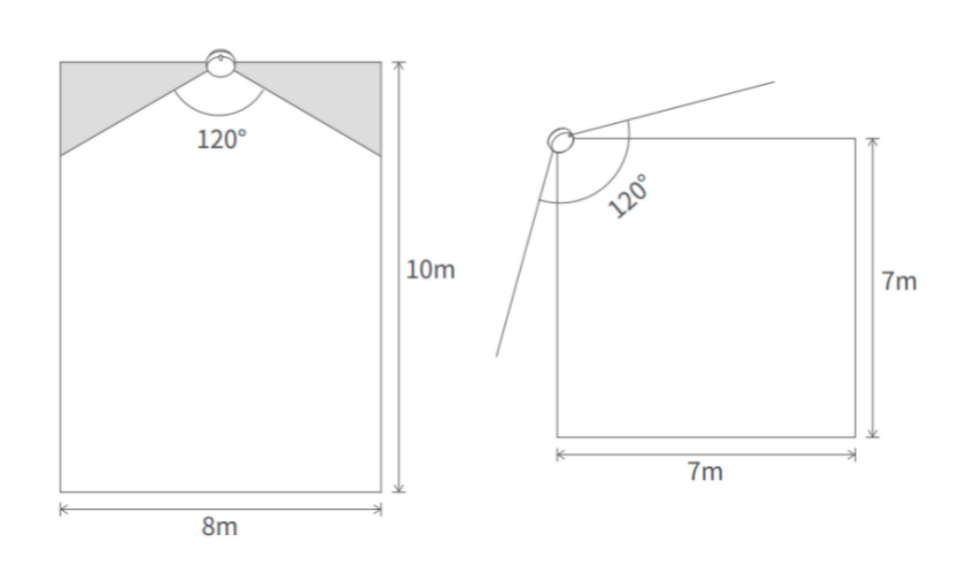
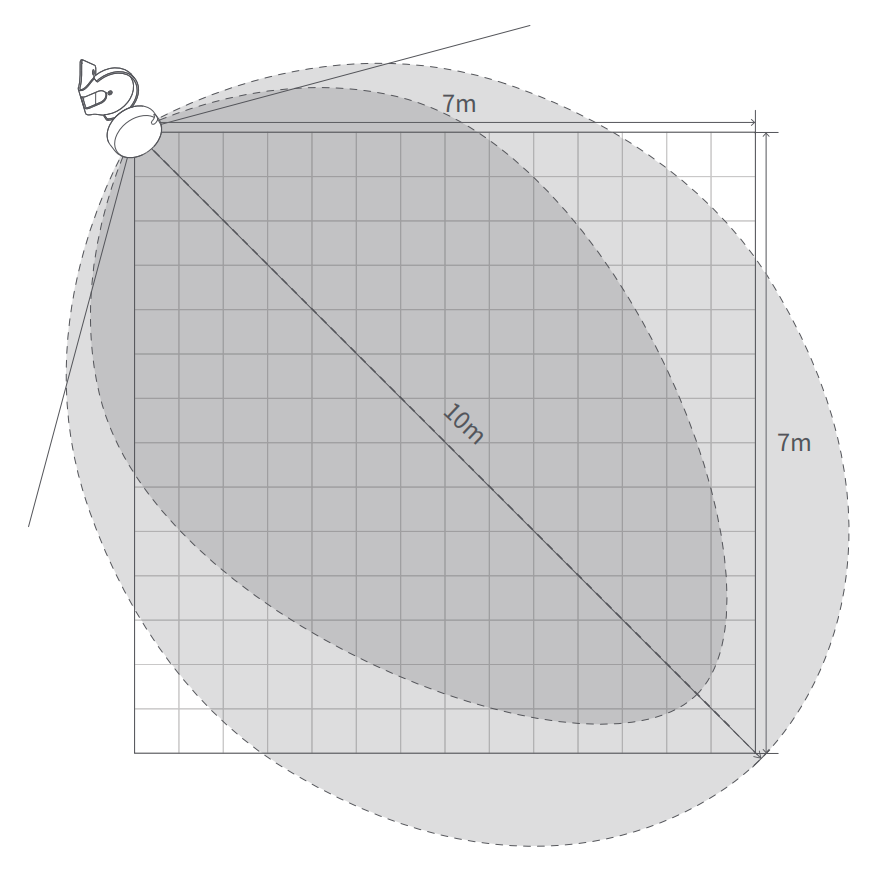
- Maximum detection range: 7m × 7m (excessive tilt may reduce detection range)
Corner wall mounting allows the 120° detection angle to cover the corner, avoiding large blind spots on both sides when wall-mounted.
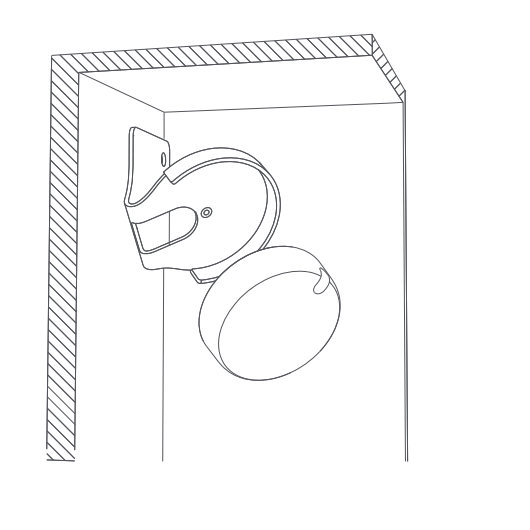
- Wall corner bracket (Presence Sensor Bracket) is optional, accessories shall be subject to the product accessory list.
- The above maximum detection range is measured under laboratory conditions; actual motion and presence detection ranges may vary due to installation height, angle, wall reflection, environmental interference, target posture, and other factors.
- Corner mounting effectively avoids long-distance blind spots on both sides of the wall and is recommended over center-of-wall mounting.
Ceiling Mounting
- Installation Height: 3m–4m, placed directly above the area to be detected
- Detection Angle: Using the device’s logo as reference, horizontal 120°, vertical 100°
- Installation Requirements: Adjust the device to be horizontal, with device’s logo aligned horizontally with the detection area's long side, indicator light facing upward on the app’s map.
- Maximum detection range: At an installation height of 3m, the maximum human motion detection range is a 5×6m ellipse directly below the device, and the maximum human presence detection range is a 4×5m ellipse directly below the device
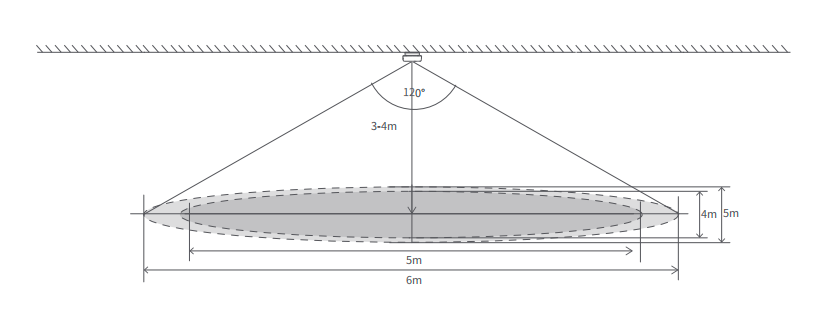
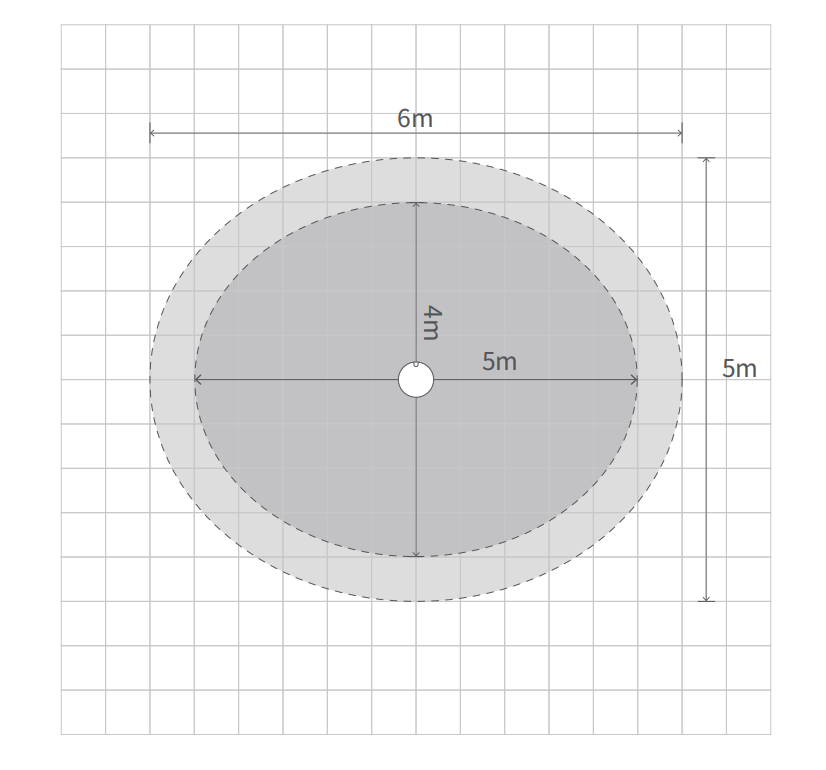
- The above represents the maximum detection range measured under laboratory conditions; the actual motion and presence detection ranges may vary due to installation height, ceiling reflectivity, environmental interference, target posture, and other factors.
Installation Recommendations
- Based on actual detection range requirements, install the device via adhesive or magnetic mounting on walls, corners, ceilings, or similar locations. Ensure the front of the device faces the area to be monitored, and adjust the angle accordingly.
- For wider detection coverage, side mounting is recommended at a height of approximately 2 m, with the device slightly tilted downward to cover the primary human activity area.
- If side-mounted on walls or corners, the recommended installation height is 1.5–2 m; within this range, the device can better detect standing and sitting human postures. For installation at other heights, adjust the bracket’s tilt angle as needed to cover the main human activity area.
- To minimize detection blind spots, install the device in a corner and orient it toward the corner’s centerline, effectively avoiding blind spots in the device's field of view (FOV) at longer distances.
- It is recommended to orient the sensor toward the chest area of a person's front side to more easily detect subtle respiratory movements and maintain accurate static presence detection.
- During installation, try to avoid facing large metal, glass, or other highly reflective surfaces, and avoid installing near air conditioning vents, air purifiers, or fans.
- When installing below 2 m, secure the device using the adhesive pad or magnetic mount; when installing above 2 m, use screws for fixation.
- Incorrect installation positioning settings will affect detection performance. Once installation and setup are complete, do not move the device, as this will impact detection accuracy in mapped areas. If relocating the device is necessary, switch the installation method in the app and complete the guided setup process again.
Device Network Pairing
Powering the Device
Connect the device’s USB cable to a 5V 1A power source. After powering up, the device automatically enters network pairing mode, and the LED indicator starts slowly blinking blue.
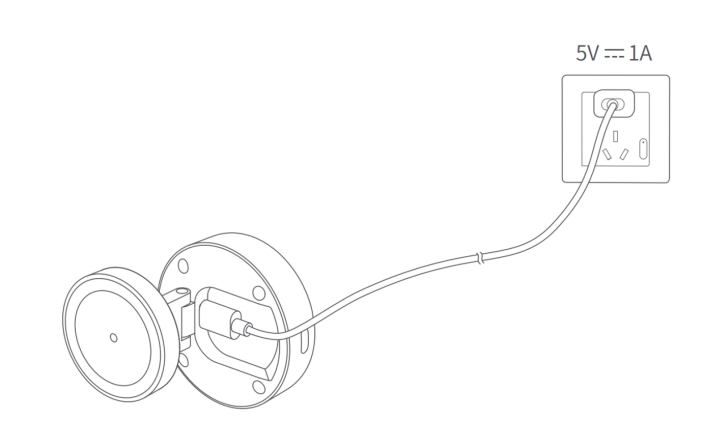
Entering Network Pairing Mode
If the network pairing window has passed, press and hold the reset button for 5 seconds until the LED indicator starts blinking, then release, and the device will enter network pairing mode again.
Add Device
Depending on whether you want to add this device to the Aqara Life App or Aqara Studio, please refer to the following steps:
During setup, the device must be in network pairing mode (LED in breathing state); if the LED shows another status, press and hold the reset button for 5 seconds to re-enter network pairing mode.
Add to Aqara Life App
Download the Aqara Life app (scan the QR code in the manual, or search and download from the Aqara official website / Apple App Store / Google Play), open the Aqara Life app, go to the "Home" page, tap the "+" icon in the upper-right corner to enter the "Add Device" page, and follow the in-app instructions to complete setup.
Add to Aqara Studio
To add this device in Aqara Studio, please refer to the following documentation according to the protocol currently used by the device:
Share to Third-Party Ecosystems
Zigbee Protocol: Bridge to Third-Party Ecosystem via Aqara Matter Hub
If the device has been added to Aqara Life via the Zigbee protocol, after configuration, it can bridge the device status to the third-party ecosystem through an Aqara Matter Hub (such as M3). You can obtain the Matter pairing code in the "Third-Party Matter Ecosystems" of the corresponding hub. In the third-party platform app, scan the Matter pairing code or enter the numeric code to complete the addition.
Thread Protocol: Synchronize to Third-Party Ecosystem via Matter Pairing Code
If the device has been added to Aqara Life via the Thread protocol, first configure custom zones, detection sensitivity, Absence Confirmation Period, and other settings in the Aqara Life app. Then it can be shared to third-party Matter platforms via a Matter pairing code as one general presence sensor, with up to 8 custom zone presence sensors, and one light sensor. You can obtain the Matter pairing code in "Third-Party Matter Ecosystems" on the device page in the Aqara Life app. Launch the "Add Device" process in third-party Matter-supported apps like Apple HomeKit and Google Home, and complete the addition by scanning the pairing code.
Synchronize to Third-Party Ecosystems after Direct App-Based Network Setup (Requires Existing Thread Network)
If the current home already has a Thread network but no Aqara-branded Matter controller, FP400 also supports connecting to a Matter controller on the local network through the Aqara Life app to directly onboard the device to Aqara Life via the Thread protocol and configure it. Follow the relevant instructions in the Aqara Life app.
After the device is onboarded via direct app connection, when the smartphone and the device are on the same local network, you can configure custom zones, detection sensitivity, Absence Confirmation Period, and other settings for the device. Once configured, the device can be synchronized to third-party Matter ecosystems as 1 general presence sensor, up to 8 custom-zone presence sensors, and 1 light sensor. Refer to section "Thread Protocol: Synchronize to Third-Party Ecosystem via Matter Pairing Code" for the synchronization steps.
-
Direct app connection configuration only supports configuring and managing the device over the local network; remote configuration is not supported, nor are features such as duration statistics, automation, and logs.
-
The device also supports direct addition to third-party Matter platforms by scanning the Matter code on the device itself without going through configuration in the Aqara Life app. However, in this way, it can only be used as one general presence sensor and one light sensor. It is recommended that users configure the device through the Aqara Life app before synchronizing it to third-party platforms to use the device’s full functionality.
-
Some third-party ecosystems may not support dynamic adding and deleting of zones, so it is recommended to complete all configurations in Aqara Life before synchronizing via the pairing code.
-
When adding to other platforms, be sure to scan the Matter pairing code generated by the app, and do not scan the original QR code on the device or manual, otherwise pairing will fail.
-
Regarding custom zone names, due to ecosystem limitations, the naming in the Aqara Life app may not be directly synchronized. After adding, users need to name the corresponding sensors in the third-party ecosystem to distinguish their actual areas.
-
If there are issues with sensor naming or display in third-party ecosystems, you can delete and re-add the device to synchronize the latest device settings and status. Some ecosystems may not sync zone names configured in the Aqara platform in real time.
-
Actual functionality may be limited by Matter standard functions and third-party Matter platform support.
Firmware Upgrade and Protocol Switching
Firmware Upgrade
To ensure optimal performance, after device setup is complete, update the device firmware to the latest version via the Settings page in the app before use.
If the latest firmware cannot be obtained in third-party ecosystems, users can add the device in Aqara Life and perform two "protocol switch" operations (e.g., switch from Thread to Zigbee, then back to Thread) to pull and upgrade to the latest firmware from the cloud.
Protocol Switching
If you need to switch protocols during device usage, remove the device first in the Aqara Life app, then hold the device’s reset button for 5 seconds to reset it and enter pairing mode. On the device pairing screen, tap "Switch Protocol" and select the desired protocol, then follow the app instructions to complete setup.
Switching protocols will clear all device settings and data. If you want to preserve map configurations for future use, please save the map template first.
Key Features Overview
Person Detection
Detect the presence or absence of people in the entire space and in custom-defined zones.
The response speed of "occupied" / "unoccupied" status is affected by environmental interference, target posture, installation conditions, etc. There may be a delay in triggering the unoccupied state (see the "Absence Confirmation Period" section of this manual).
Multi-Person Tracking
Real-time positioning of people in the space can be viewed on the device's homepage. By creating custom zones, it supports triggering occupancy status by zone, with the ability to simultaneously track up to 10 people.
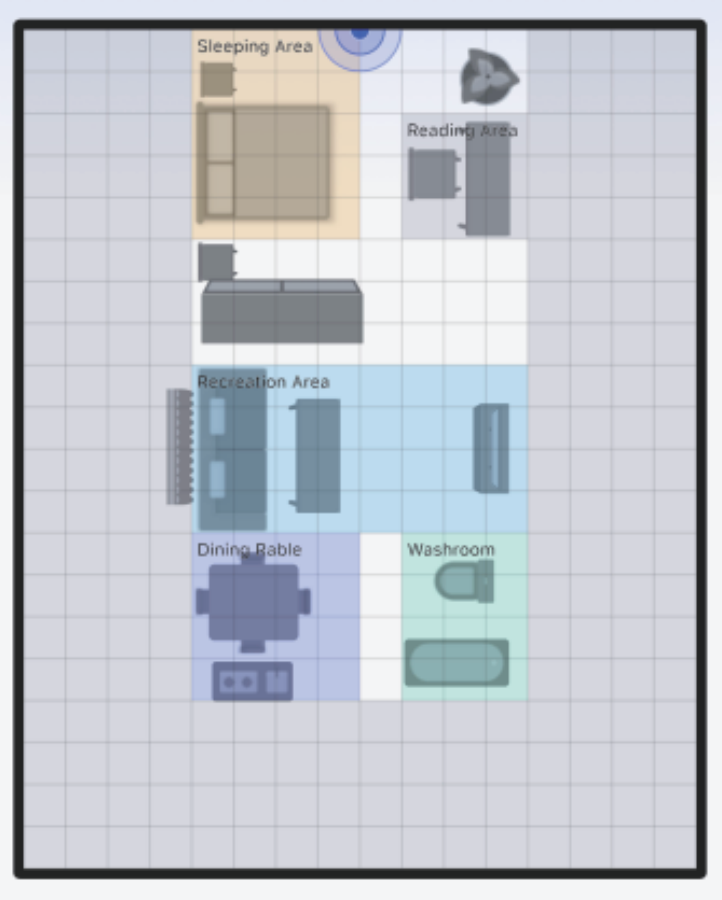
- Detecting and distinguishing multiple people works when people are separated by 1 meter.
- When two people are less than approximately 1 meter apart, point cloud mixing may occur, potentially causing algorithm instability (human/non-human label swapping), person "adhesion" and other phenomena, which are physical limitations of current millimeter-wave radar technology. It is recommended to maintain appropriate spacing and set densely populated areas as larger "monitoring zones" rather than fine-grained positioning.
Zone Division
The device supports up to 8 custom zone settings, which can be further configured as follows:
Monitoring Zone
Different functional areas can be defined according to household space usage, and automated management per monitoring zone is supported. Monitoring zones can be classified by type; specifying the zone type helps the device better adjust corresponding parameters to deliver optimal recognition performance.
Interference Source
Interference sources can be set based on the locations of moving objects such as fans, air conditioners, and indoor plants. Interference sources can be configured as point-shaped or area-shaped, and micro-movements within the designated interference zones will be ignored.
Environmental interference is a key factor affecting device accuracy. The FP400 supports automatic interference source identification. When the algorithm detects potential interference sources within the space, it will prompt the user to confirm and configure the corresponding area as an interference source. Manual configuration of interference sources is also supported to filter specific interference zones within the environment.
- Common interference sources have already been optimized in the algorithm: fans, air purifiers, robotic vacuum cleaners, slightly moving plants, curtains, sliding curtains and roller shades, pets, toilets, air conditioners, and refrigerators. For unlisted sources (e.g., new appliances, dynamic decorative items), recognition performance may degrade, with a certain probability of false detection as human presence.
Entrance/Exit
After setting up entry and exit zones, the speed of target creation and deletion at entry and exit locations can be improved, enhancing detection accuracy and trigger speed. It is recommended to configure according to the actual area after installation.
Boundary
Configuring boundaries reduces misjudgment of person coordinates (commonly known as "ghosting"), and avoids interference caused by reflections from walls, large mirrors, metal surfaces, etc., improving monitoring accuracy.
Boundary configuration is the most critical setting after enabling the personnel positioning feature. Without edge setup, the device may easily generate false targets due to signal reflections from walls. Once edges are defined, no targets will be created beyond the edge, and valid targets will not enter the edge area, effectively improving detection accuracy.
Large reflective surfaces such as glass curtain walls, stainless steel surfaces, smooth tiles, or mirrors are the main sources of "ghosting." It is recommended to prioritize setting these areas as "boundaries" to effectively reduce reflection interference.
AI Enhanced Person Detection
Enabling "AI Enhanced Person Detection" in "Advanced Functions" can direct AI algorithms to identify sweeping robots, pets, moving toys, etc. as "interference targets", reducing interference with person detection results (but with a certain probability of identifying babies or children on the ground as "interference targets"). It is recommended to enable only in scenarios with sweeping robots, pets, and other interference targets.
- After a new target is created, it requires about 2-3 seconds of initial confirmation period, during which the target will be displayed as "..." unknown identity, and related automation will be correspondingly delayed in triggering.
- Low-height targets (such as those significantly shorter than a normal adult) and crawling posture targets have a certain probability of not being stably recognized as humans or being misclassified as pets. If such situations exist at home, it is recommended to use the "AI Enhanced Person Detection" function with caution.
- The optimal detection range for AI Enhanced Person Detection is 5 meters; beyond this range, accurate exclusion of non-human targets may not be possible.
Real-Time People Count
Enabling "Real-Time People Count" in "Advanced Functions" will provide real-time occupancy status and time-segmented people count statistics. The homepage will display a real-time people count card, which can be selected to enter the time-segmented people count statistics page.
- When staying on the app’s device homepage for a long time, the app may not be able to refresh in real-time. If you encounter an inaccurate people count displayed on the page, you can exit the device page and re-enter to obtain an accurate real-time people count.
- In scenarios with multiple people present, due to point cloud aliasing and mutual occlusion, the people count may have a deviation of 1-3 persons, which is a normal performance under current technical conditions and does not constitute a device failure. If precise people count is strictly required, it is recommended to refer to the trend rather than an exact count.
Static and Dynamic Detection
Monitors whether personnel in the space are in a stationary or active state. When someone moves with a significant amplitude or exceeds 50cm, the device will report "people moving"; when all targets in the space have an activity range smaller than 50cm or are in a micro-motion state, the device will report "all people stationary". You can configure automations based on "People moving / All people stationary".
Illuminance Detection
Real-time monitoring of environmental light intensity, displaying illuminance measurement values, and enabling automation scenarios based on lighting conditions and occupancy status.
The illuminance sensor on the device is located on the front upper part of the device and is affected by device installation location, orientation, and light incidence angle. The feedback light value is not entirely consistent with the actual light perceived by people in the space. This illuminance sensor is mainly used to feedback the strength and change trend of environmental light for lighting automation and cannot be used as a professional illuminance measuring instrument.
More Configuration Options
Presence Detection Sensitivity
Presence detection sensitivity is configured for the entire space. The higher the sensitivity, the easier it is to trigger and maintain the "occupied" state. High sensitivity is suitable for areas where people are typically stationary, avoiding misidentifying a space as "unoccupied" during micro-motion. Low sensitivity is suitable for areas with frequent and large human body movements, avoiding false "occupied" reports caused by spatial interference.
Absence Confirmation Period
The Absence Confirmation Period can be used to precisely judge whether the area is in an "unoccupied" state, avoiding false reports due to personnel briefly leaving, slight movements (such as wind blowing curtains, small items falling), or environmental interference. After setting the time period, the radar needs to complete an entire cycle of "unoccupied" determination before triggering the "unoccupied" state. If someone enters during the cycle or encounters environmental interference (such as pets running, device vibration), the timing will immediately restart, recalculating from the next "unoccupied" detection. Users can set different Absence Confirmation Periods for the entire space and each custom zone.
- The actual trigger time for an unoccupied state in the space may not necessarily equal the "Absence Confirmation Period" because more cycles might be needed for judgment in complex environments.
- When the Absence Confirmation Period for the space and custom zones are inconsistent, such as a shorter periods set for the space, it may result in the space being judged as unoccupied while the area is still judged as occupied.
- When a longer period is set for an area, but the target's trajectory has already left the area, the area may remain in an occupied state for some time, with the area edges highlighted to indicate occupancy.
- The unoccupied determination response speed is affected by the degree of environmental interference. In scenarios with micro-motion interference (such as pets, fans, curtain swaying), the unoccupied determination may experience additional delay.
AI Spatial Learning
AI Spatial Learning can learn environmental backgrounds, exclude large areas of glass, metal, mirrors, and other interference sources that affect detection results, adapt to environmental interference, and improve detection accuracy.
It is recommended that users actively perform an AI Spatial Learning check after device installation. AI Spatial Learning requires maintaining an empty space (without people) and takes some time, so please be patient.
During normal use, there is no need to manually perform the check again, as the device will continuously learn the space background through AI to adapt to real-time changes in the space’s environment, making the device more precise with use.
In special situations, if users find that the device is affected by environmental interference and mistakenly identifies an empty state as occupied, and it is difficult to return to an empty state, they can actively conduct an AI Spatial Learning check to quickly restore the space to an empty state.
If "ghost targets" frequently appear when no one is present, it is recommended to run an AI Spatial Learning check to restore normal operation.
Default and Left-Right Detection
Users can choose between the default, which is omnidirectional monitoring, and left-right monitoring in "Detection Direction".
Default monitoring can detect presence within the sensing range. Left-right monitoring can detect movement directions on the left and right sides of the space, helping to better distinguish between left entry/right entry/left exit/right exit movement states. When selecting default monitoring, it supports configuring "entry/exit" automation conditions for the entire area and specific zones. When automations require distinguishing between entering and exiting, left-right monitoring can be selected.
When omnidirectional detection is selected, "Entry / Exit" automation conditions for both whole area and sub-regions can be configured. For scenarios requiring differentiation between entering and exiting, left-right detection can be selected.
When left-right monitoring is selected, "entry/exit" automation conditions will be split into "left entry/right entry/left exit/right exit". Left-right monitoring only applies to the entire area, with regions not distinguishing left and right entry/exit events.
"Entry" events are only triggered when the first target enters an empty area or region. "Exit" events are only triggered when the last target leaves an area or region. Since "entry" and "exit" are triggered by target trajectories, "entry" can be triggered faster than "occupied" when "AI Enhanced Person Detection" is enabled (without waiting for target confirmation), and "exit" can be triggered faster than the "unoccupied" automation condition when the space or region is empty (without waiting for the Absence Confirmation Period).
If there is no directional monitoring requirement, it is recommended to use the default monitoring.
Proximity Sensing Distance
This setting affects the proximity sensing distance for people relative to the device and to specified zones. Low, medium, and high settings correspond to thresholds of 1 meter, 2 meters, and 3 meters respectively.
Entire area and zone-based automations both have "approach/leave" events, where any target approaching/leaving this threshold will trigger an "approach/leave" event.
When the automation conditions include "approach/leave", this distance corresponds to the distance between the target and the device; when the automation condition selects "someone approaching/leaving a specified zone", this distance corresponds to the distance between the detected person and the edge of the specified zone.
If set to medium (2 meters), with the automation condition selecting "someone approaching a specified zone", when a person approaches the area from outside and is about 2 meters from the zone’s edge, a zone approach event will be reported; when a person moves outside the area to 2 meters beyond the edge, a leaving zone event will be reported.
Turn Off Indicator Light
When enabled, the indicator lights are completely turned off during specified periods, this includes all statuses and alerts which it would normally indicate.
Network reset and other indicator light functions are not within the Turn Off Indicator Light scope and can still function normally during the network access process.
Automation Configuration
Users can go to the app's "Automation" page and tap the "+" in the upper-right corner to add automations related to the device.
[]
Automation Conditions
| General Automation Conditions | Zone Automation Conditions |
|---|---|
| Occupied | Specified Zone Occupied |
| Unoccupied | Specified Zone Unoccupied |
| Occupied for a Certain Duration | Specified Zone Occupied for a Certain Duration |
| Unoccupied for a Certain Duration | Specified Zone Unoccupied for a Certain Duration |
| Approaching | Approaching Specified Zone |
| Leaving | Leaving Specified Zone |
| Entering (supported in omnidirectional mode) | Enter Specified Zone |
| Leaving (supported in omnidirectional mode) | Leave Specified Zone |
| Left entry (supported in left-right mode) | / |
| Right entry (supported in left-right mode) | / |
| Left exit (left/right mode supported) | / |
| Right exit (left/right mode supported) | / |
| Real-time number of people greater than | / |
| Real-time number of people equal to | / |
| All people in space remain stationary for a certain duration | / |
| People moving in space for a certain duration | / |
| Illuminance rises to | / |
| Illuminance drops to | / |
| Above specified illuminance | / |
| Below specified illuminance | / |
Automation Recommendations
- WHEN "Presence is detected (zone)" and "Below the set light level", THEN "turn on light", which can achieve turning on lights in a specific zone with people present when light is needed.
- WHEN "No presence exceeding a set time", then "turn off light" and "turn off air conditioning", achieving energy saving when the space is unoccupied
- WHEN "Somebody enters from the left", THEN "home mode" / WHEN "Somebody exits from the right", THEN "away mode", achieving home/away distinction and triggering corresponding scenes
- WHEN TV Zone detects "Somebody is approaching (zone)", THEN "trigger reminder", avoiding children getting too close to the TV
- WHEN "All detected people remain still for a set time", THEN enter "sleep mode", automatically adjusting to a comfortable sleeping environment
- WHEN "Movement detected for a set time", THEN enter "motion mode", automatically activating a user’s favorite scenes
- WHEN "Person count is higher than 3", THEN enter "reception mode", "set air conditioning to 24 degrees Celsius", implementing dynamic scene adjustment based on the number of people
- WHEN "Someone is approaching (zone)", THEN "turn on the light", WHEN "Someone is leaving (zone)", THEN "turn off the light", enabling automated lighting control in the specified area
More Use Tips
- After installation, it is recommended to actively perform an "AI Spatial Learning" in the App when no one is present, helping the device quickly adapt to its environment, exclude interference from glass, metal, etc., and improve detection accuracy.
- If the device mistakenly identifies an empty space as occupied, it is generally due to environmental micro-motion interference. You can use the "AI Spatial Learning" feature to quickly return to an empty state, or set a specific area as an "interference source" in the map on the device’s homepage.
- It is recommended to configure the detection range according to actual needs, set unnecessary detection areas as boundaries, and mark entry and exit areas to improve detection speed and accuracy.
- The device has an "AI Enhanced Person Detection" function with a continuous self-learning algorithm which can become more precise with use. However, to ensure maximum detection accuracy, it is still recommended to avoid installing the device near air conditioning outlets, air purifiers, or fans.
- The "AI Enhanced Person Detection" function can improve the accuracy of presence detection in the space, excluding false alarms caused by pets, sweeping robots, etc. It can be enabled when relevant interference objects are present in the space.
- It is recommended to regularly check target trajectories in the app to confirm whether there are unconfigured interference sources or strong reflection areas in the current environment, and to add "interference sources" and "boundaries" on the map.
- If you need to detect both a larger area and more detailed zones, we recommend first setting appropriate “detection zone” boundaries in the app, then adjusting the sensitivity and Absence Confirmation Period based on your actual needs.
Indicator Light and Button Description
Indicator Light Status
| Indicator light status | Device status |
|---|---|
| Blue light flashes quickly 1 time | Single press the device; the reset button’s blue light will flash once |
| Blue light flashes 3 times | Appears when powered on, restarted, or reset to factory settings, indicating normal power supply |
| Blue breathing (Thread firmware) / Purple breathing (Zigbee firmware) | Indicates the device is in broadcast mode; broadcasting ends after 10 minutes, light turns off, and device enters deep sleep mode |
| Blue light flashing rapidly continuously | When resetting the device, the blue light flashes quickly until the button is released within 3 seconds. During pairing, the blue light continues to flash quickly, indicating that pairing is in progress. |
| Blue light stays on for 1 second | Indicates successful pairing |
Button Action
| Button Action | Description |
|---|---|
| Single press reset button | Check Zigbee hub connection, verify hub is within a valid distance (only triggered when bound to a Zigbee hub) |
| Press and hold reset button for 5 seconds or more | Resets the device and enables network configuration mode |
| Quickly press reset button 10 times in short succession | Restore factory settings |
Device Reset
Device reset only resets the network and enters the reconnection state, without deleting local data. Ensure the device is powered on, press and hold the reset button for 5 seconds, then release the button when the LED starts flashing rapidly. The device will reset and enter Bluetooth advertising mode.
Factory Reset
A factory reset refers to resetting the network and deleting all local and cloud data. Ensure the device is powered on, quickly press the reset button 10 times. The device will enter factory reset mode.
Product Specifications
| Parameter | Description |
|---|---|
| Product Model | KJCGQ11LM, PS-S05E, PS-S05D |
| Wireless Protocols | Zigbee, Thread, Bluetooth |
| Rated Input | 5V⎓1A |
| Interface | USB-C |
| Product Dimensions | 64×64×29.5 mm |
| Operating Temperature | -10°C~+50°C |
| Operating Humidity | 0-95%RH, non-condensing |
| Waterproof Rating | IPX5 |
| Applicable Standard | GB4943.1-2022 |
The radio transmission equipment model approval code for this product is printed on the product body.
Troubleshooting Guide
False Alarm "Presence Detected" (No Person There)
| Possible Causes | Troubleshooting and Resolution Steps |
|---|---|
|
|
Person Detected not Activating when a Person is There
| Possible Causes | Troubleshooting and Resolution Steps |
|---|---|
|
|
Static Target (Sleeping/Sitting for a Long Time) Detection Is Unstable
| Possible Causes | Troubleshooting and Resolution Steps |
|---|---|
|
|
Frequent Target Positioning Jumps or "Ghost" Appearances in the App.
| Possible Causes | Troubleshooting and Resolution Steps |
|---|---|
|
|
Inaccurate People Counting
| Possible Causes | Troubleshooting and Resolution Steps |
|---|---|
|
|
Third-Party Ecosystem Function Abnormal or Status Not Synchronized
- First, confirm in the Aqara Life app that the device status is normal and firmware is up to date
- Delete the device on the third-party platform and re-add it using the Matter pairing code
- Confirm the device is connected using the Thread protocol, and ensure the Matter hub supports all required features.
- Complete all zone and parameter configurations within Aqara Life before syncing
- Check whether the third-party platform fully supports Matter presence sensors. Refer to the platform’s official documentation for details.
Unable to Pair or Device Unresponsive
- Confirm the device is powered by a 5V 1A standard power supply, with a normal indicator light response after power-on
- Press and hold the reset key for 5s to put the device in pairing mode (blue light slow/fast blinking)
- Place the device close to the Matter hub to reduce the communication distance
- Confirm the Matter hub is online and functioning normally
- If issues still persist, quickly press the reset key 10 times to restore factory settings and retry
Frequently Asked Questions (FAQ)
Installation and Deployment
Where and at what height is the FP400 recommended to be installed?
For side mounting, the recommended height is 1.5–2m, which ensures detection accuracy for standing, sitting, and static breathing scenarios. For wider coverage, side mounting around 2m is recommended. For ceiling mounting, the recommended height is 3–4m; for blind-spot-free detection, corner mounting is preferred.
Can the FP400 be installed in humid environments such as bathrooms or kitchens?
Yes, this product has an IPX5 protection rating, meaning it is splash-resistant and suitable for use in humid indoor environments such as bathrooms and kitchens. However, keep it away from open flames and areas exposed to direct high-temperature steam.
Why is corner mounting more effective than mounting in the middle of a wall?
Corner mounting fully utilizes the 120° detection angle, eliminating the long-distance blind spots on both sides of the device that occur with wall mounting. This results in more uniform coverage and effectively reduces the probability of missed detection.
Is it normal if the device's detection range differs from the specifications in the manual?
This is normal. The values stated in the manual represent the maximum detection range under ideal laboratory conditions. In actual use, mounting height, angle, wall/metal reflections, airflow, target posture, and obstructions can all affect the effective range of motion and presence detection, and unavoidable blind spots may exist.
Functions and Recognition Accuracy
When people are sleeping or sitting still for a long time, will the device incorrectly detect them as absent?
FP400 uses millimeter-wave radar to accurately detect subtle human breathing movements. With proper configuration, it can steadily recognize static presence. It is recommended to set the detection sensitivity to high and appropriately extend the Absence Confirmation Period, which can significantly avoid misjudging static presence as unoccupied.
Can the FP400 detect falls or human posture?
No. FP400 only supports presence detection ("occupied" / "unoccupied") and motion state detection ("movement detected" / "all people stationary"). It does not have fall detection or posture recognition capabilities and cannot determine whether a person is standing, sitting, or lying down.
I have pets or a robotic vacuum cleaner at home, and the device frequently gives false alarms for human presence. How should I handle this?
- Enable "AI Enhanced Person Detection" to automatically filter out non-human targets such as pets and robotic vacuums (note: there is a small chance that infants or small children may be misidentified as pets).
- Designate areas with frequent pet/vacuum activity as "interference sources" to ignore micro-motion signals in those zones.
- Slightly reduce detection sensitivity to minimize environmental interference triggers.
Why does the app show false targets that are not human (commonly known as "ghosting")?
"Ghosting" occurs when the device misidentifies false targets due to multipath echoes caused by strong reflective surfaces such as walls, metal, mirrors, or glass. Defining the reflective area as "Boundary" type or readjusting the installation angle to avoid strong reflections can significantly improve this issue. It is recommended to manually set Boundary zones in the app after installation.
The space is clearly unoccupied, yet the app still shows "someone present." What could be the reason?
| Main Cause | Solution |
|---|---|
| Micro-movements from environmental interference (curtains swaying, fan rotation, air conditioning airflow, pet activity) | Set the interference source area as "interference source" type |
| Residual "ghosting" | Perform an "AI Spatial Learning" in the app |
| Reflective surface areas | Set reflective surface areas as "boundary" |
A person is in the room, but the app is showing that no presence is detected. What could be the reason?
| Main Cause | Solution |
|---|---|
| Improper installation height or angle | Ensure the device is aimed toward the human activity area; adjust the device's direction or lower the installation height accordingly |
| Detection sensitivity is too low | Enter the app and increase sensitivity appropriately |
| The person is in a distant edge zone or heavily obstructed | Shorten the Absence Confirmation Period to see if performance improves |
| The person is extremely still (e.g., sleeping) | Ensure sensitivity is high and extend the Absence Confirmation Period appropriately |
Multi-target and Positioning
When multiple people are present, the headcount is inaccurate—Is this normal?
It is normal within a certain margin of error. When multiple people are present, due to point cloud overlap and mutual occlusion among targets, the headcount may deviate by 1–3 persons, and accuracy cannot reach 100%. For scenarios requiring high precision in headcount, we recommend referring to the "Real-Time People Count" trend in the app. It should not be used as a basis for exact counting.
The recognition result is unstable when two people are close—What causes this?
When the planar distance between two targets (human or non-human) is less than approximately 1 meter, point cloud overlap occurs, causing algorithm instability such as misclassification (swapping of human/non-human labels) or one target being "attracted" to another's position. We recommend setting densely populated areas as larger "Monitoring Zones" in the App rather than for precise localization.
When one person enters and stays very close to another, the positioning shown in the app suddenly jumps away?
When the distance between two targets is less than approximately 1 meter, the algorithm pauses classification to avoid point cloud overlap. During this time, the target remains in a "Pending Confirmation" state (displayed as "...") and returns to normal once the targets separate beyond 1 meter. Optimal detection performance is achieved when targets are over 1 meter apart.
Why does target positioning occasionally jump to walls or windows and then return to normal after a while?
This is the "ghosting" phenomenon, commonly seen near large glass, mirrors, or metal surfaces. Signal reflections generate false targets at non-existent locations. We recommend configuring the reflective areas as "Boundaries" or performing an "AI Spatial Learning" in the App to adapt to the environment.
Custom Areas
Custom zones were set in the app, but the number of zones displayed on third-party platforms (such as Apple Home) is incorrect. How do I fix this?
- Some third-party Matter platforms do not support dynamic zone addition/deletion. We recommend completing all zone configurations in Aqara Life before syncing to third-party platforms.
- After syncing, manually name the relevant presence sensors in the third-party platform to distinguish zones.
- Try removing and re-adding the device in the third-party platform to sync the latest status.
What scenarios are the four zone types—"Monitoring Zone," "Interference Source," "Entry/Exit," and "Boundary"—used for?
| Zone Type | Applicable Scenario and Purpose |
|---|---|
| Monitoring Zone | Main functional areas such as living rooms or bedrooms, used to trigger automations based on presence/absence |
| Interference Source | Areas with continuous minor movements (e.g., fans, plants, pet activity zones), configured to filter out signals from these zones |
| Entry/Exit | Entrance/exit locations, improves detection speed for people entering or exiting |
| Boundary | Reflective surfaces such as walls, glass, or metal, prevents ghosting and false targets when configured |
Network Access and Protocol
Is an Aqara hub required to use the FP400?
An Aqara hub is required to access the full Aqara ecosystem and all device features. If you directly scan the device's Matter code through a third-party ecosystem, the device can only be used as 1 presence sensor and 1 ambient light sensor, without the ability to configure custom zones or access advanced settings.
What are the functional differences between the Zigbee and Thread protocols?
| Difference | Description |
|---|---|
| Local automation and response speed | Zigbee protocol, when used with an Aqara hub, is typically faster |
| Cross-platform compatibility | Thread natively supports Matter, making it easier to integrate with third-party platforms such as Apple Home and Google Home. |
How do I switch the FP400 from the Thread protocol to the Zigbee protocol?
First remove the device in the app, then press and hold the reset button for 5 seconds to reset the device. On the pairing screen, tap “Switch Protocol”, select the target protocol, and follow the instructions to complete pairing. Switching protocols will erase all settings, equivalent to a factory reset, so remember to save the current map as a template first.
Third-Party Ecosystem
What should I do if custom zones that have been set cannot be displayed in third-party ecosystems?
- First complete all zone and parameter configurations within the Aqara Life app, then synchronize to the third-party platform via the Matter pairing code.
- Some third-party platforms do not support dynamic zone modifications, try removing and re-adding the device.
- Zone names must be manually updated within the third-party platform to match actual locations.
What should I do if scanning the QR code on the physical device fails when adding the device to a third-party platform?
When adding a second or subsequent platform, scan the secondary Matter pairing code generated in the Aqara Life app, not the original QR code on the device or manual. Reusing the original code for repeated additions will cause pairing failure.
FP400 functions unstably in a third-party ecosystem, and its status does not match that in Aqara Life?
- First confirm the device status is normal and the firmware is up to date in Aqara Life.
- Delete the device from the third-party platform and re-add it using the Matter pairing code.
- Confirm the Thread protocol connection and ensure the Matter hub supports full functionality.
- Complete all zone and parameter configurations in Aqara Life before synchronization.
Product Capability Boundary Description
Supported Target Types
FP400 has been specially optimized for the following common interference sources: fans, air purifiers, sweeping robots, subtle plant movements, curtains (sliding and rolling curtains), pets, toilets, air conditioners, refrigerators. For other unlisted interference sources, recognition performance may decrease, with a certain probability of misidentification as human.
Multi-Target Tracking Accuracy Description
In scenarios with multiple targets simultaneously, due to radar angular and distance resolution limitations, when two targets' planar distance is less than about 1 meter, point clouds may overlap, potentially causing unstable classification, target "adhesion", people counting deviations (1-3 person error), etc. This is a physical limitation of current millimeter-wave radar technology that cannot be completely eliminated.
Static Detection Accuracy Description
The device captures human body breathing micro-movements through millimeter-wave radar to achieve presence detection. Detection is stable and reliable in normal sitting/standing postures; for deep sleep, long-distance, or edge area personnel, detection may be unstable or targets may be lost due to weak breathing micro-movement signals. Recommended to optimize detection effect by increasing sensitivity and extending human Absence Confirmation Period.
Detection Range and Blind Area Description
The detection range noted in the manual is the maximum value under ideal laboratory conditions. In actual use, effective range will be smaller than laboratory values due to factors like installation height, tilt angle, ceiling reflection, environmental airflow, target posture, and obstructions. Device has blind areas outside horizontal 120°, vertical 100° FOV, and areas beyond the device's direct facing direction. Avoid placing critical areas (especially entrances/exits) in blind areas.
Target Classification Boundary Description
Low-height targets (such as children under approximately 1.4 meters), crawling posture targets have a certain probability of not being stably identified as human, or being misclassified as pets. For new interference sources not in the optimization list, there is also a probability of misidentification as "human".
Function Platform Difference Description
After synchronizing the device to a third-party Matter platform, actual function support depends on Matter standard function support and third-party platform's Matter implementation degree, which may differ from Aqara Life app. Recommended to use with
Trademarks and Badges

- Bluetooth® word mark and logos are registered trademarks of the Bluetooth SIG, and Shenzhen Lumi United Technology Co., Ltd. has obtained permission for any such trademark use. Other trademarks and trade names belong to their respective owners.
- Using the "Works with Apple" badge means that the accessory is specifically designed to work with the technology indicated on the badge and has been certified by developers, meeting Apple's performance standards. Apple is not responsible for the operation of this product or its compliance with safety regulations.
Service Support
| Service Content | Details |
|---|---|
| Service Hotline | 400-990-7930 (Weekdays 10:00~18:00) |
| Service Website | www.aqara.com/support |
| Service Email | service@aqara.com |
| Manufacturer | Shenzhen Lumi United Technology Co., Ltd. |
| Address | Room 801-804, Building 1, Chongwen Park, Nanshan Intelligence Park, 3370 Liuxian Avenue, Futian Community, Taoyuan Street, Nanshan District, Shenzhen |