Timer Blocks
Screenshots in this guide may look slightly different from what you see on your device. Please follow the actual interface for reference.
Overview
Timer blocks let you precisely control when actions happen in your automation flows.
You can use timer blocks to:
- Trigger actions at a specific time or within a time period
- Delay the next step
- Transform a transient state into a time interval
- Trigger an action only after several other actions have finished in order
Here are the timer blocks available:
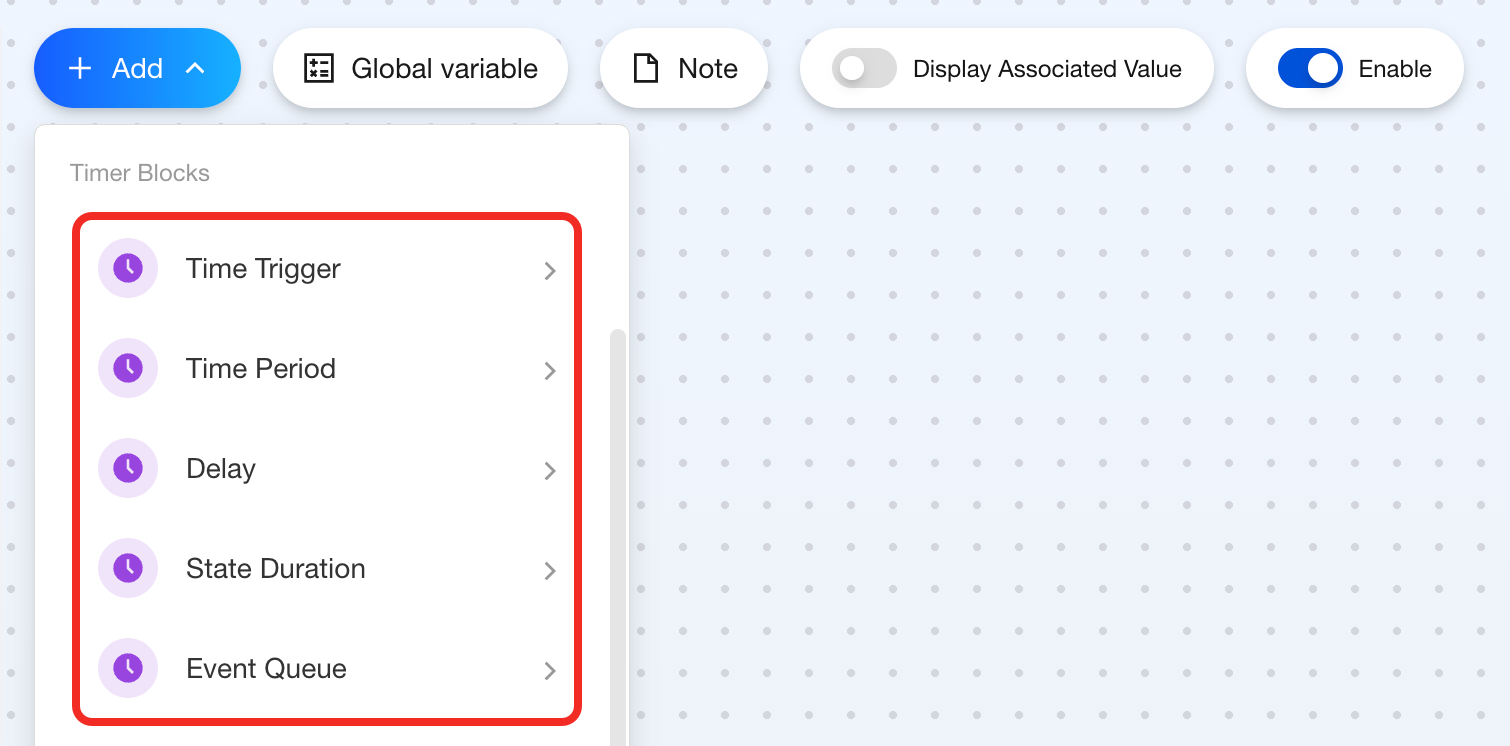
Time Trigger
Feature
Use the Time Trigger block when you want an action to happen at a specific time.
Components
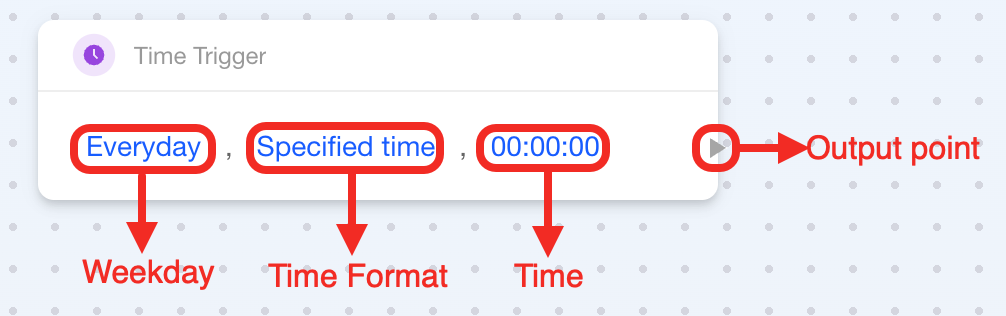
This block is a single-output block with three parameters:
| Parameter / Connection Point | Required | Description |
|---|---|---|
| Weekday | ✔ | Choose which days of the week the action should be triggered. You can select multiple days. |
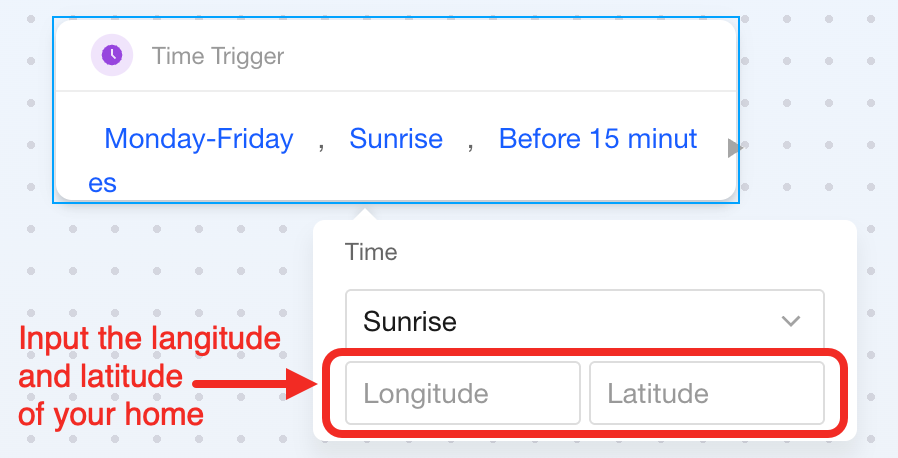
| Time Format | ✔ | Choose from Specified Time, Sunrise, or Sunset. |
| Time | ✔ | The meaning of this field depends on the "Time Type":
|
| Output Point | ✔ | Connect this to the action you want to trigger. |
How to Use
Here’s how to set up a Time Trigger block:
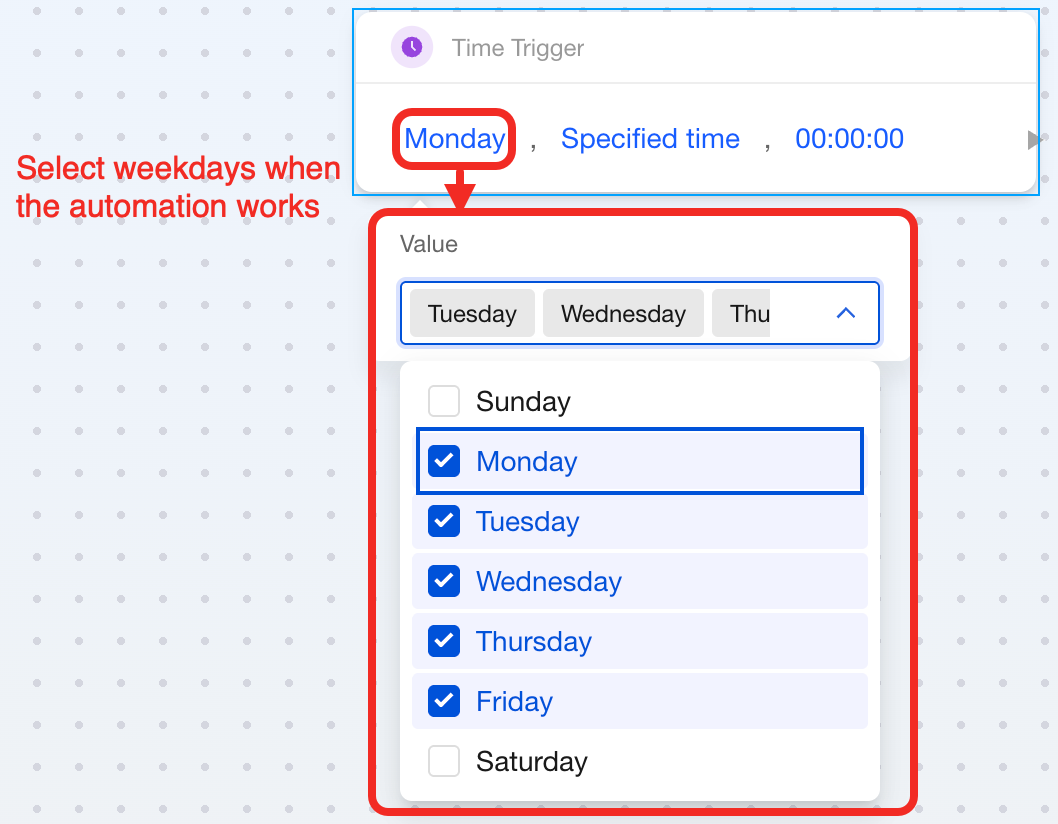
-
Select the days of the week when you want the action to run (you can pick more than one day).
-
Choose the time type.
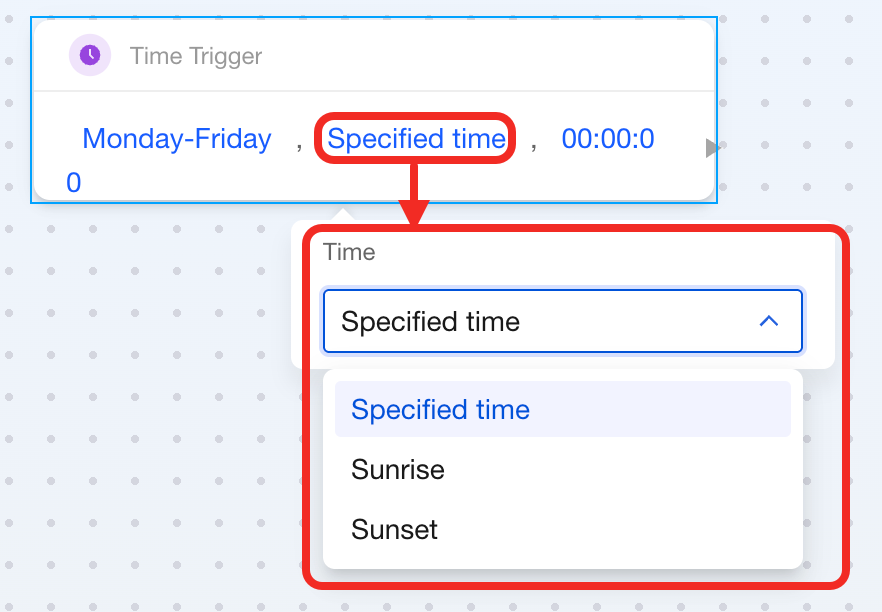 note
noteIf you choose
SunriseorSunset, you’ll need to enter your home’s latitude and longitude:- North latitude and east longitude: use positive numbers (e.g., North 35.0° →
35.0) - South latitude and west longitude: use negative numbers (e.g., West 120.0° →
-120.0)
- North latitude and east longitude: use positive numbers (e.g., North 35.0° →
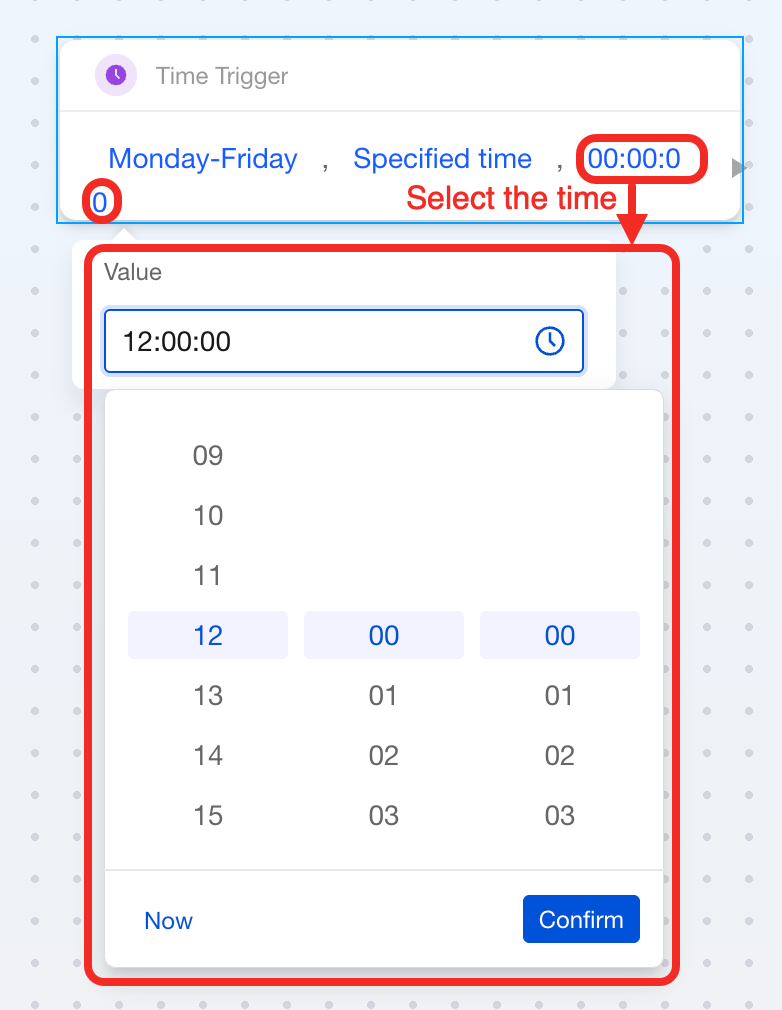
-
Set the time.
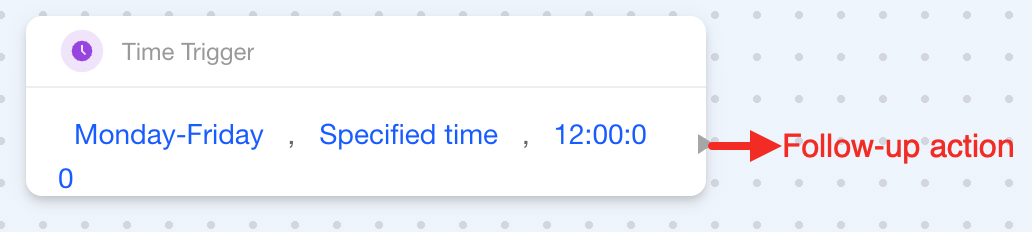
-
Connect the output on the right side of the block to the action you want to trigger.
Time Period
Feature
This block sets up a rule: a subsequent action runs only when the previous one has occurred during the specified time period.
Components
This block is a dual-point block with three parameters:
| Connection Point / Parameter | Required | Description |
|---|---|---|
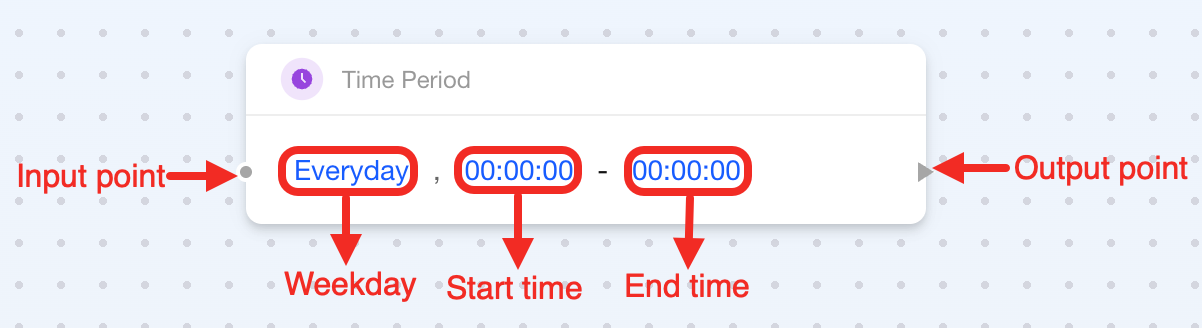
| Input Point | ✔ | Connect to an Event block). |
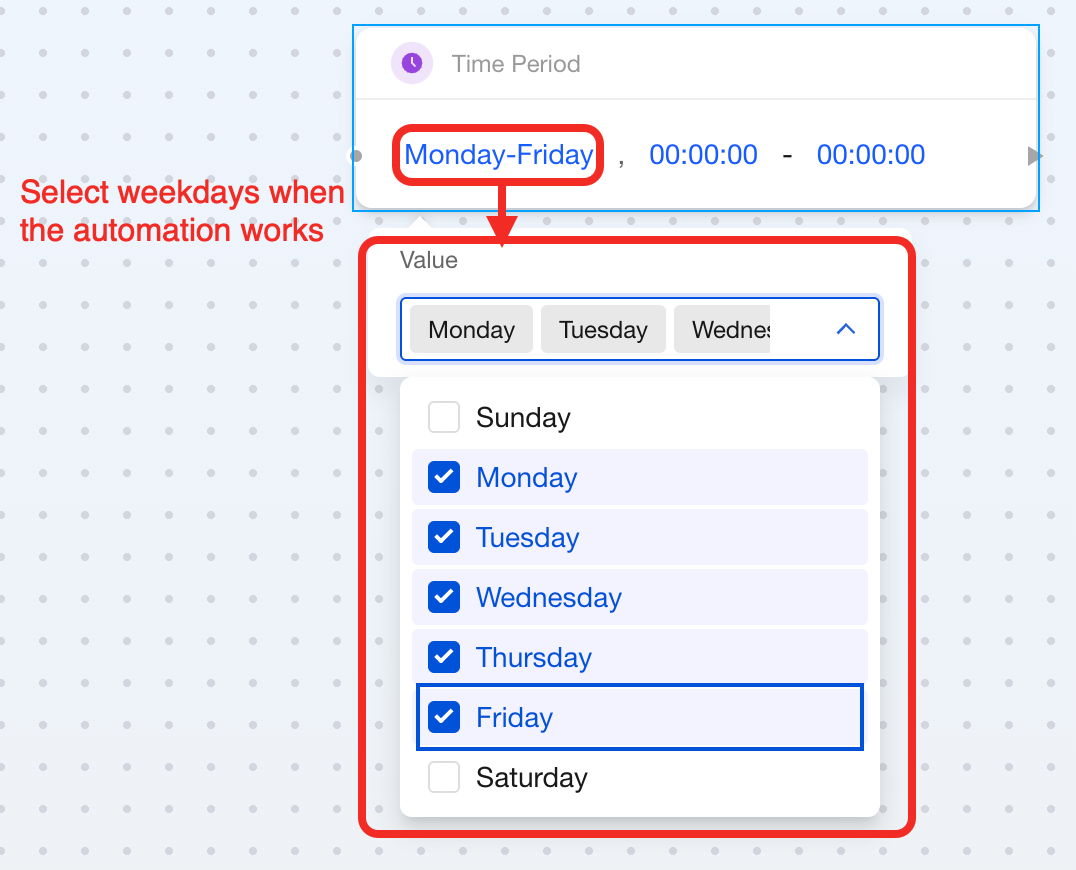
| Weekday | ✔ | Select the days when this logic works. You can select multiple days. |
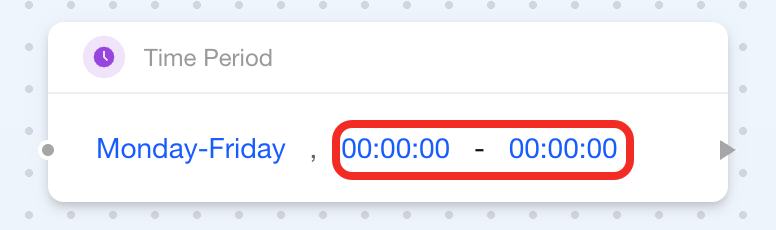
| Start Time | ✔ | Start time (24-hour format). |
| End Time | ✔ | End time (24-hour) format. |
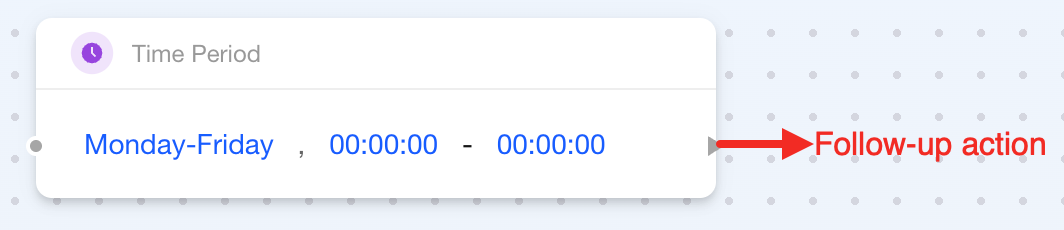
| Output Point | ✔ | Connect to the action you want to trigger. |
How to Use
Here's how to set up a Time Period block:
-
Select the days of the week when you want the action to run (you can pick more than one day).
-
Set the time period.
noteWhen you set the time period to 00:00:00-00:00:00, the action will be active all day.
-
Connect the input on the left side of the block to an event block.
This means the follow-up action will only be triggered if the event occurs within the specified days and time period.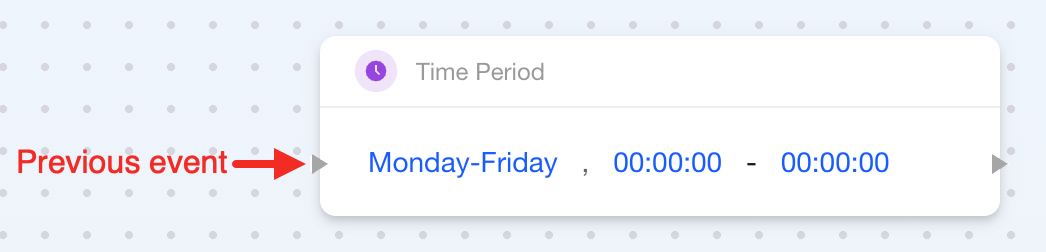
-
Connect the output on the right side of the block to the action you want to trigger.
Delay
Feature
Use the Delay block when you want to wait for a specified amount of time after one step completes before triggering the next step.
You can use this block in the following scenarios:
- Debounce Processing: To prevent false triggers caused by frequent sensor signal fluctuations.
- Delayed Response: To execute a follow-up action after waiting for a certain amount of time once an event occurs.
- Timed Linkage: For example, to automatically turn off the light 30 seconds after the door opens.
Components
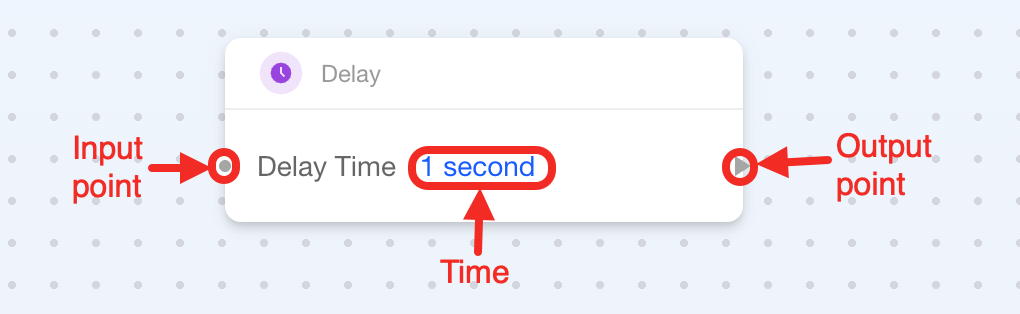
This block is a dual-point block with one parameter:
| Connection Point / Parameter | Required | Description |
|---|---|---|
| Input Point | ✔ | Connect to the previous step. |
| Delay Duration | ✔ | Delay duration, supports seconds, minutes, or hours. |
| Output Point | ✔ | Connect to the step that will be triggered after the delay. |
How to Use
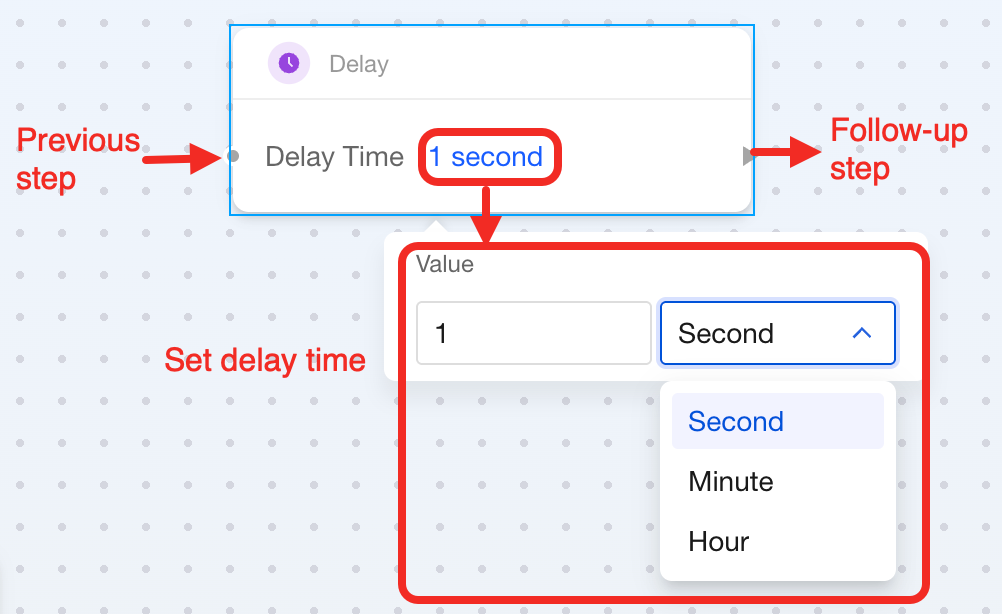
Here's how to set up a Delay block:
- Connect the first step to the left side of the block.
- Connect the second step to the right side of the block.
- Set the delay duration.
State Duration
Feature
The State Duration block has two main uses:
- Delayed parameter modification: Automatically modify device boolean parameters within a specified time after an event or state occurs.
- Extend transient states: Transform a transient event or state into a time interval with duration, which can be used for logical operations (AND/OR) on multiple states and trigger subsequent steps based on the operation results.
Components
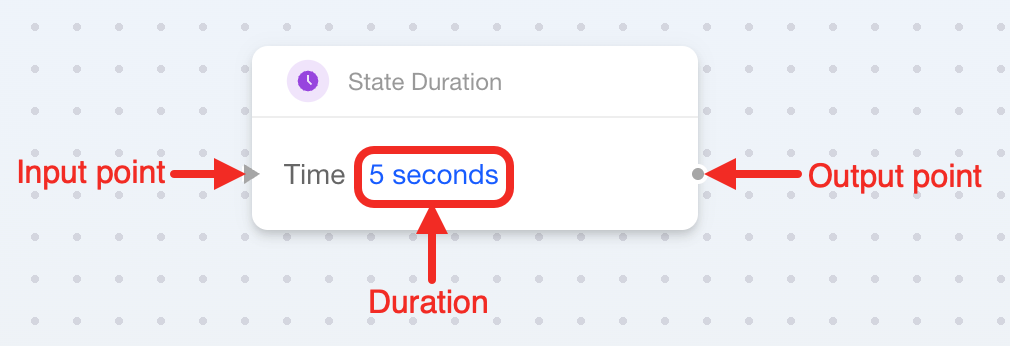
This block is a dual-point block with one parameter:
| Connection Point / Parameter | Required | Description |
|---|---|---|
| Input Point | ✔ | Connect to the event or state that needs to be monitored (Event block. |
| Duration | ✔ | State duration, supports seconds, minutes, or hours. |
| Output Point | ✔ | Based on usage, supports connecting to the following blocks:
|
How to Use
Modify Device Boolean Value
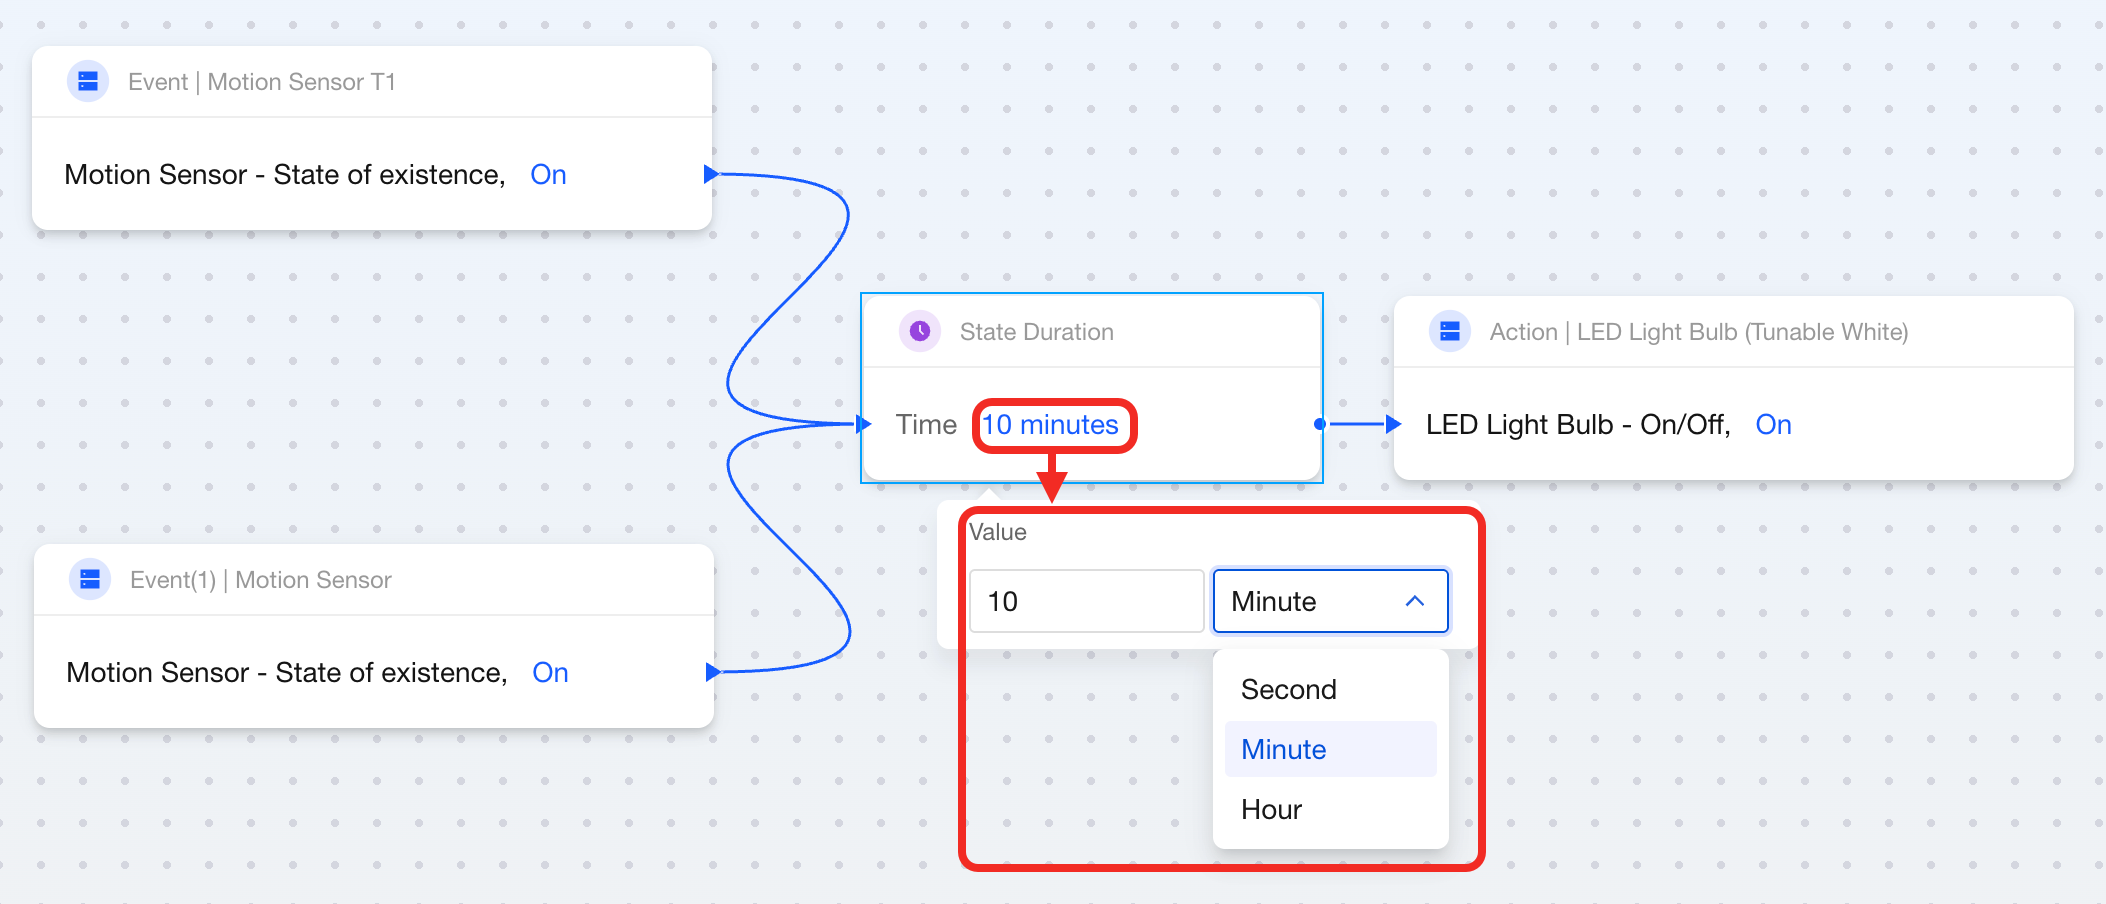
The above example shows how State Duration is used to modify device boolean values:
- Two motion sensors are installed in the room. If either sensor detects motion, the
State Durationblock is activated and outputstrueto the light switch block. - Each time a sensor detects motion again, the "existence" duration is automatically extended by 10 minutes, keeping the light on.
- If no sensors detect motion during this period, after the 10-minute countdown ends, the State Duration block outputs
falseand the light turns off.
Steps:
- Connect the
Eventblock to the left side of the State Duration block (in the image, those are 2 motion sensors' existence block). - Set the state duration (supports seconds, minutes, or hours).
- Connect the boolean
Point Datablock to the right side of the State Duration block (in the image, this is a light bulb's switch state).
Control Devices Based on Logical Operation Results
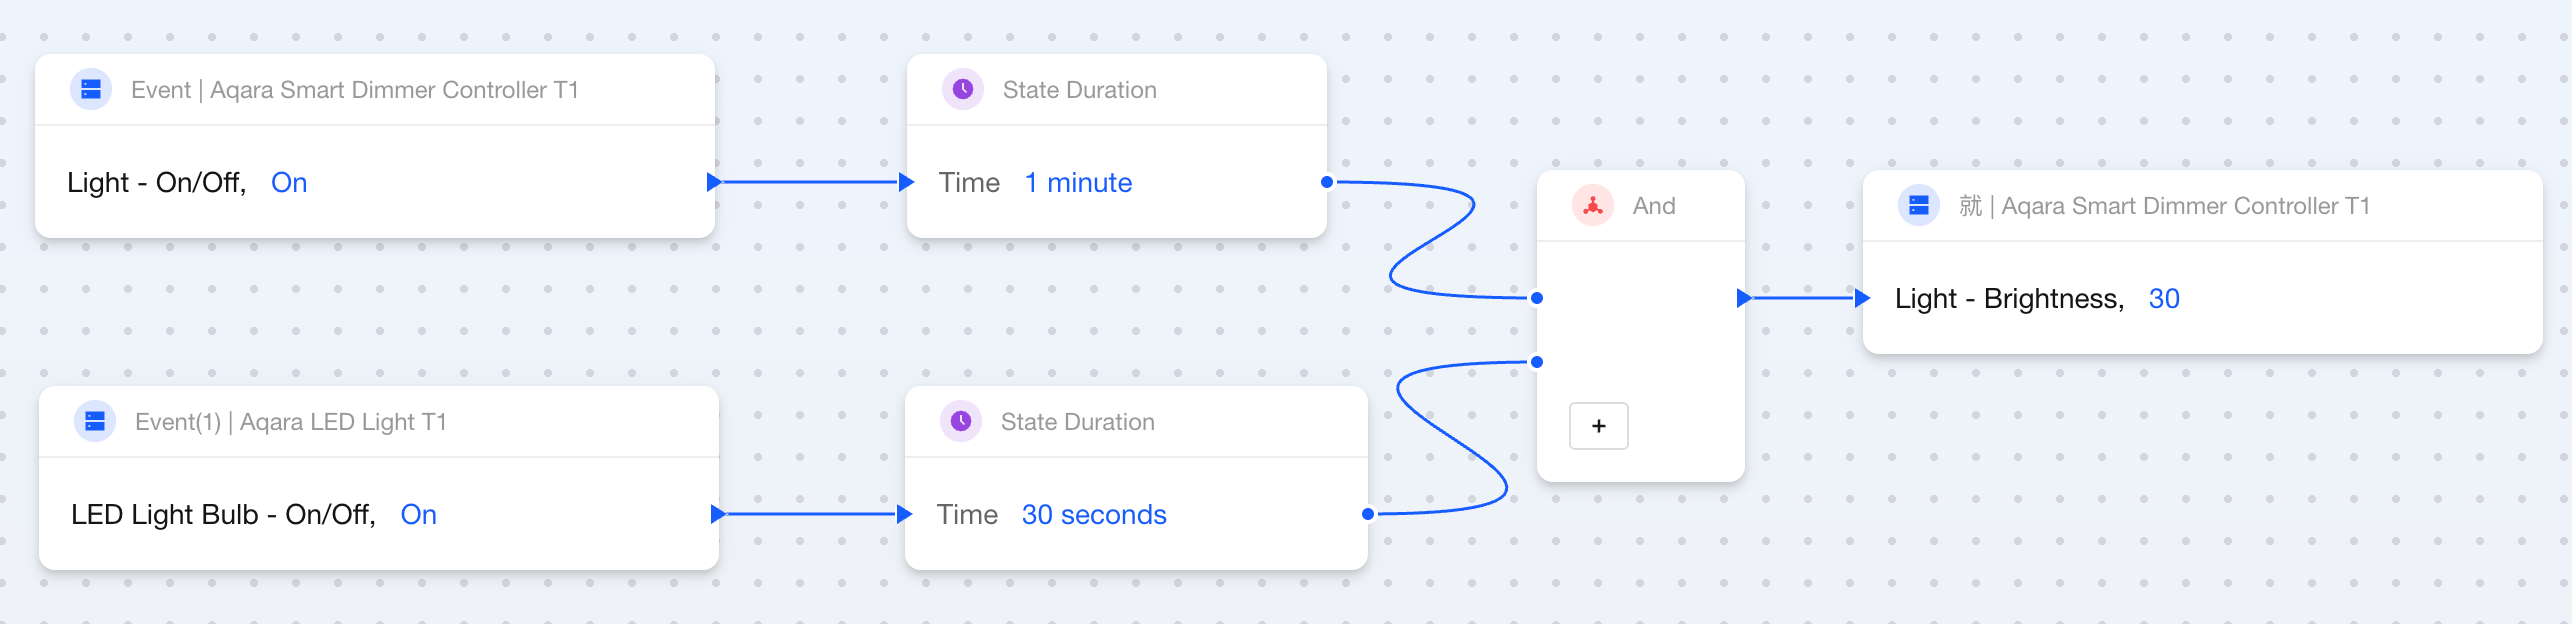
The diagram shows two scenarios where the Aqara Smart Dimmer Controller T1 automatically adjusts the brightness to 30%:
- The Aqara LED Light T1 turns on within 1 minute after the** Aqara Smart Dimmer Controller T1** is switched on.
- The Aqara Smart Dimmer Controller T1 is switched on within 30 seconds after the Aqara LED Light T1 turns on.
Steps:
- Add 2 or more "Event-State Duration" flows.
- Connect the above flows to an
ANDblock. - Connect the output point of the
ANDblock to Action blocks.
Event Queue
Feature
Use the Event Queue block when you want to define a series of events that should occur in a specific time sequence to trigger subsequent steps. For example, if an indoor motion sensor detects someone within 10 seconds after a door lock is unlocked, trigger the air conditioner to turn on.
Components
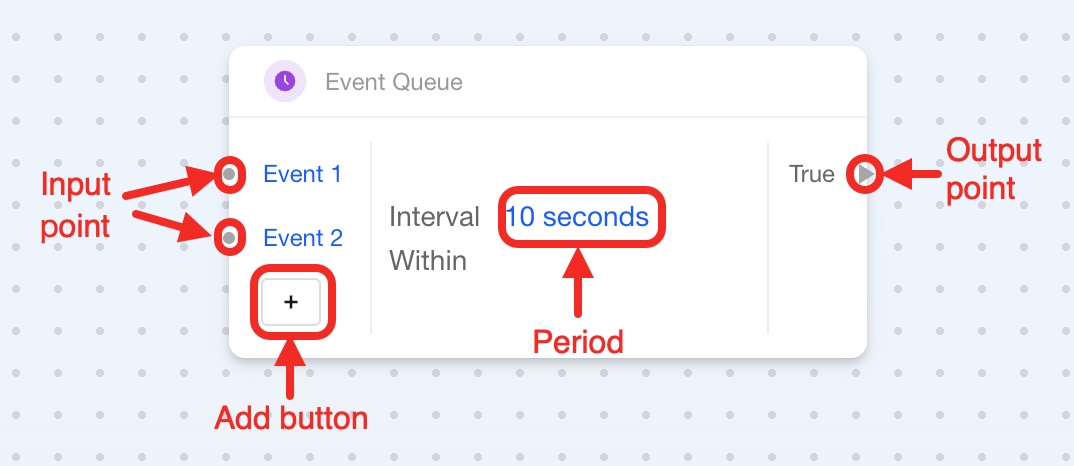
This block is a multi-point block with one add button and one configuration parameter:
| Connection Point / Parameter | Required | Description |
|---|---|---|
| Event 1 (Input Point) | ✔ | It represents event sequence 1, and timing starts from this event. It usually connects to Event block, but can also connect to Condition block |
| Event 2 (Input Point) | ✔ | It represents event sequence 2, and connects to Event block |
| Add Button | ✘ | It is used to add more input points to connect more events. |
| Interval Duration | ✔ | It specifies the interval duration, supports seconds, minutes, or hours. |
| True (Output Point) | ✔ | It connects to Action block as the subsequent triggered behavior. |
How to Use
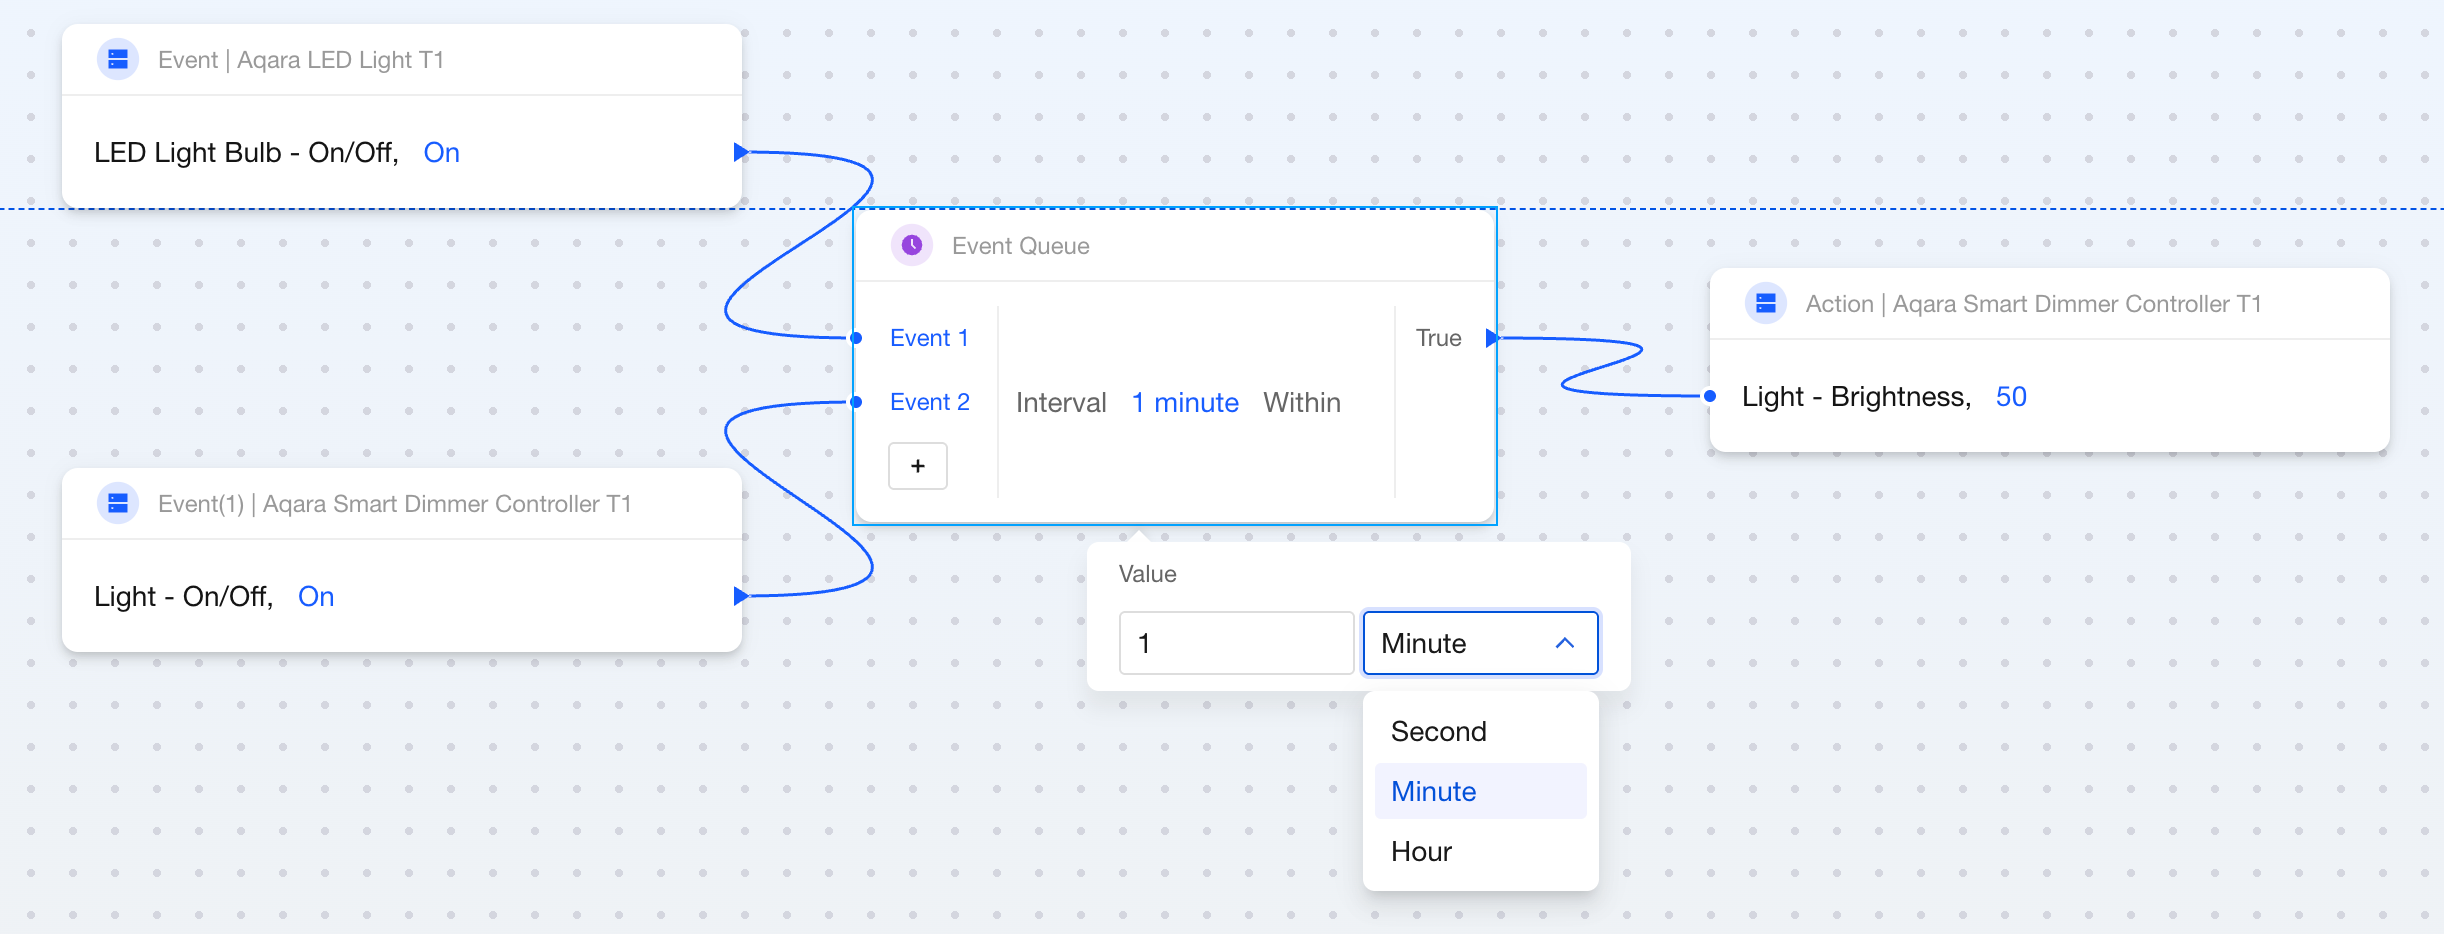
The above example shows that when the Aqara LED Light T1 is turned on, if the Aqara Smart Dimmer Control is also turned on within 1 minute, then adjust the Aqara Smart Dimmer Control's brightness to 50.
Steps:
- Connect different
Eventblocks to the input points on the left side of theEvent Queueblock in sequence (in the image, these are the switch state blocks for Aqara LED Light T1 and Aqara Smart Dimmer Control). - Set the interval duration.
- Connect
Actionblocks to the output point on the right side of theEvent Queueblock (in the image, this is the brightness adjustment block for Aqara Smart Dimmer Control).